说明书 飞利浦HD2061豆浆机
需要您的 飞利浦HD2061豆浆机 手册吗? 您可以在下面免费查看和下载中文版 PDF 手册。 该产品目前有 0 个常见问题,0 条评论,有 0 票。 如果这不是您想要的手册,请联系我们。
您的产品是否出现故障而说明书没能提供解决方案?请前往 Repair Café 以获得免费维修服务。
说明书
Loading…

HD2061
Register your product and get support at
www.philips.com/welcome
Important safety instructions
1
Overview
3
Use the appliance
Warning
•If you wish to cancel a function once it is
selected, do not lift the top unit to prevent the
facial scalding. You can unplug the power cord,
re-plug it, and then select another function.
Make soymilk
•Measure ingredients as instructed. You can adjust the
quantity to fit your personal taste.
•For 2-4 servings.
1 Take a cup of dry soybeans with supplied measuring
cup and wash it thoroughly.
•To extend the life of the blade, soak the soybeans
(8-9 hours in fall and spring, 6-7 hours in summer,
and 9-10 hours in winter) and wash it thoroughly
before processing.
2 Put the soybeans evenly at the bottom of the pot.
3 Pour water into the pot. Make sure that the water level
is between MAX (the maximum level indication) and
MIN (the minimum level indication).
4 Put the top unit into the pot. Make sure that the upper
plug is correctly inserted into the connector.
5 Open the power connection cover, insert the power
cord, and connect the power.
»
The indicators flash in cycle, indicating that the power
is connected.
6 Press Select to select Soymilk.
»
The Soymilk indicator lights up.
7 Press Start.
»
The In Progress indicator flashes and the appliance
sounds once, indicating that processing starts.
»
After about 25 minutes, you will hear 6 beeps and
the Keep Warm indicator will light up indicating that
soymilk is ready. The appliance will automatically enter
keep warm mode. This lasts for an hour, and then
automatically stops (see the Keep warm section).
8 After processing, disconnect the power. Hold the handle of
the pot tightly with one hand and lift the top unit with the
other hand.
9 Filtrate soymilk with the filter and it is ready to serve. You
can add some sugar before serving.
Tips
•To shorten the processing time, you can add
warm water no hotter than 70°C.
•Soymilk can also be served without being
ltrated.
Make five grains soymilk
•Measure ingredients as instructed. You can adjust the
quantity to fit your personal taste.
•For 2-4 servings.
1 Measure 30g of soybeans (around 1/2 cup) and 50g of
rice (around 1/2 cup) with the supplied measuring cup.
Wash them thoroughly.
•To extend the life of the blade, soak the soybeans
(8-9 hours in fall and spring, 6-7 hours in summer,
and 9-10 hours in winter) and wash it thoroughly
before processing.
2 Put the rice and the soybeans evenly at the bottom of
the pot.
3 Pour water into the pot. Make sure that the water level
is between MAX (the maximum level indication) and
MIN (the minimum level indication).
4 Put the top unit into the pot. Make sure that the upper
plug is correctly inserted into the connector.
5 Open the power connection cover, insert the power
cord, and connect the power.
»
The indicators flash in cycle, indicating that the power
is connected.
6 Press Select to select Five Grains Soymilk.
»
The Five Grains Soymilk indicator lights up.
7 Press Start.
»
The In Progress indicator flashes and the appliance
sounds once, indicating that processing starts.
»
After about 26 minutes, you will hear 6 beeps and
the Keep Warm indicator will light up indicating that
soymilk is ready. The appliance will automatically enter
keep warm mode. This lasts for an hour, and then
automatically stops (see the Keep warm section).
8 After processing, disconnect the power. Hold the handle of
the pot tightly with one hand and lift the top unit with the
other hand.
9 Pour soymilk into the cup, and it is ready to serve. You can
add some sugar before serving.
Tip
•To shorten the processing time, you can add
warm water no hotter than 70°C.
Make rice paste
•Measure ingredients as instructed. You can adjust the
quantity to fit your personal taste.
•Example recipes: lily bulb and barley rice paste, for 2-4
servings.
1 Measure 35g of barley and 35g of rice (around 2/5
cup each) with supplied measuring cup. Then, take
20g of fresh lily bulbs (around 7-8 pieces). Wash them
thoroughly.
2 Put the lily bulbs, barley, and rice evenly at the bottom
of the pot.
3 Pour water into the pot. Make sure that the water level
is between MAX (the maximum level indication) and
MIN (the minimum level indication).
4 Put the top unit into the pot. Make sure that the upper
plug is correctly inserted into the connector.
5 Open the power connection cover, insert the power
cord, and connect the power.
»
The indicators flash in cycle, indicating that the power
is connected.
6 Press Select to select Rice Paste.
»
The Rice Paste indicator lights up.
7 Press Start.
»
The In Progress indicator flashes and the appliance
sounds once, indicating that processing starts.
»
After about 26 minutes, you will hear 6 beeps and
the Keep Warm indicator will light up indicating that
soymilk is ready. The appliance will automatically enter
keep warm mode. This lasts for an hour, and then
automatically stops (see the Keep warm section).
8 After processing, disconnect the power. Hold the handle of
the pot tightly with one hand and lift the top unit with the
other hand.
9 Pour rice paste into the cup, and it is ready to serve. You
can add some sugar before serving.
Tip
•To shorten the processing time, you can add
warm water no hotter than 70°C.
Make fruit/ veggie drink
•Measure ingredients as instructed. You can adjust the
quantity to fit your personal taste.
•Example recipe: banana milkshake, for 2-4 servings.
1 Cut 3 bananas (about 400g) into 1 cm cubes.
2 Put the banana cubes evenly at the bottom of the pot.
3 Pour 300ml of milk and some water into the pot.
Make sure that the water mark is between MAX (the
maximum level indication) and MIN (the minimum
level indication).
4 Put the top unit into the pot. Make sure that the upper
plug is correctly inserted into the connector.
5 Open the power connection cover, insert the power
cord, and connect the power.
»
The indicators flash in cycle, indicating that the power
is connected.
6 Press Select to select Fruit/Veggie Drink.
»
The Fruit/Veggie Drink indicator lights up.
7 Press Start.
»
The In Progress indicator flashes and the appliance
sounds once, indicating that processing starts. After
about 4 minutes, you will hear 6 beeps, indicating that
milkshake is ready.
8 After processing, disconnect the power,. Hold the
handle of the pot tightly with one hand and lift the top
unit with the other hand.
9 Pour banana milkshake into the cup, and it is ready to
serve. You can add some sugar before serving.
Tips
•After banana milkshake is ready, serve at once
to avoid oxidization.
•Wait about 10 minutes until the appliance
cools down before the next use. This makes
the appliance more durable.
Keep Warm
After soymilk or rice paste is made, you will hear 6
beeps and the Keep Warm indicator will light up.
The keep warm function lasts for an hour, and then
automatically stops.
Tips
•If you lift the top unit as soon as processing
is complete, the appliance does not start the
keep warm function.
•The appliance does not start the keep warm
function at the completion of fruit/veggie
drink.
Reproduction in whole or in part is prohibited
without the written consent of the copyright
owner. Trademarks are the property of Koninklijke
Philips Electronics N.V. or their respective owners.
All rights reserved.
© 2012 Koninklijke Philips Electronics N.V.
UMLeaet_HD2061
TW
WK1245.1
4241 210 12381
Cleaning before
first use
2
Method 1
1 Pour boiling water into the pot, put the top unit
into it, then soak for 10 minutes.
2 Clean the appliance (see the “Cleaning” section)
Method 2
1 Follow the instructions in the “Make soymilk”
section.
2 Pour the soymilk away when it is done, and then
clean the appliance (see the “Cleaning” section).
4
Cleaning
Notes
•Disconnect the power and remove the power
cord before cleaning or disassembling this
appliance.
•Do not immerse the top unit in water.
•To prevent scalding, do not touch the top
unit or inner side of the pot before they cool
down.
•Take care of sharp blades during cleaning to
avoid cutting yourself and others.
1 After disconnecting the power, lift the top unit, rinse
the lower part of the top unit, overflow sensor, blade,
and inner side of the pot.
2 Use a dry cloth to clean the top unit handle, control
panel, upper plug, upper plug connector, base, and
power cord connector. The outside of the pot can be
cleaned with a damp cloth.
Easy clean
•Promptly clean the residue on the appliance; otherwise,
the residue will dry up and stick on the appliance, and
this become difficult to remove. When this happens, you
can use the easy clean function to heat and soak the
inner side of the pot and clean the appliance easier.
•To prevent the residue from smelling, cleaning the
appliance within 10 hours after use.
1 Pour water into the pot. Make sure that water level is
between MAX (the maximum level indication) and MIN
(the minimum level indication).
2 Put the top unit into the pot. Make sure that the upper
plug is correctly inserted into the connector.
3 Open the power connection cover, insert the power
cord, and connect the power.
»
The indicators flash in cycle, indicating that the power
is connected.
4 Press Easy Clean.
»
The Easy Clean indicator lights up and sounds once,
indicating that the easy clean function starts.
»
After about 8 minutes, you will hear 6 beeps and the
In Progress indicator will turn off, indicating that the
easy clean function is complete.
5 Clean the appliance as instructed in the "Cleaning" section.
Recipes
Troubleshooting
Recycling
Do not throw away the appliance with the
normal household waste at the end of its life,
but hand it in at an official collection point for
recycling. By doing this, you help to preserve
the environment.
Guarantee and
service
If you have a problem, need service, or need
information, see www.philips.com/support or contact
the Philips Consumer Care Center in your country.
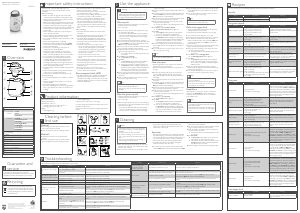
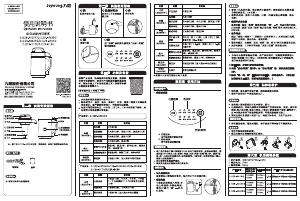
g
a
b
c
d
h
f
e
i
k
j
l
a
Handle of the top unit
b
Control Panel
•Functional
buttons
• Select
• Start
• Easy Clean
•Indicators • Soymilk
• Five Grains Soymilk
• Rice Paste
• Fruit/ Veggie Drink
• In Progress
• Keep Warm
• Easy Clean
c
Overflow sensor - Monitor soymilk and prevent
overflowing
d
Blade
e
Lower part of the top unit
f
Upper plug
g
Pot unit
h
Base
i
Power connection cover
j
Power cord connector
k
Pot handle
l
Upper plug connector
ഌට໎
MAX
3
5
Rice
Paste
Soymilk
Five Grains
Soymilk
Select
Fruit/Veggie
Drink
Start
In Progress
7
25’
26’
4’
BEEP
Read this user manual carefully before you use
the appliance, and save the user manual for future
reference.
Before processing:
•Before you insert the plug into the power outlet,
make sure that the appliance is assembled correctly.
•Make sure that your hands are dry before you insert
the plug into the power outlet.
•Before you connect the appliance to the power, make
sure that the voltage indicated on the bottom of the
appliance corresponds to the local power voltage.
•This appliance can only be used with a grounded plug.
Make sure that the plug is firmly inserted into the
power outlet.
•Never connect this appliance to a timer switch, to
avoid a hazardous situation.
•Make sure that you clean the appliance before use
(see the “Cleaning before first use” section).
•Do not use this appliance to heat up soymilk or other
liquid foods.
•Never use the appliance for dry heating.
•Never add contents (including water) above MAX
(the maximum level indication) or below MIN (the
minimum level indication).
•If the power cord, the plug, or other parts are
damaged, do not use the appliance.
•If the power cord is damaged, you must have it
replaced by Philips, a service center authorized by
Philips or similarly qualified persons to avoid a hazard.
•Do not replace parts of the appliance yourself.
•This appliance is not intended for use by persons
(including children) with reduced physical, sensory
or mental capabilities, or lack of experience and
knowledge, unless they have been given supervision
or instructions concerning use of the appliance by a
person responsible for their safety.
•For their safety, do not allow children to play with the
appliance.
•Make sure that the water you add into the soymilk
maker is warm in ambient temperature.
•This appliance is intended for household use only.
During processing:
•Do not use this appliance on an unstable or uneven
surface.
•Keep the appliance and its power cord out of the
reach of children.
•Never let the appliance run unattended.
•Be careful when lifting the top unit in upright position,
keep a good distance from steam to avoid burns or
scalding.
•Do not touch the steam or the metal parts of the
appliance, to avoid burns or scalding.
•Do not disconnect the power cord or remove the
top unit before processing is complete.
•If you have to stop processing, disconnect the power
cord before you perform other operations.
•If there is a power outage no less than 3 minutes
after start processing, do not immediately restart
the soymilk maker. Empty the contents in the
soymilk maker, and then put in new contents before
restarting. Otherwise, the contents will stick to the
pot or overflow, or the appliance will set off a long
alarm.
After processing:
•Disconnect the power before you continue other
operations.
•Disconnect the power and remove the power cord
before cleaning or disassembling this appliance.
•To prevent steam scalding, keep a certain distance
from the soymilk maker before you lift the top unit.
•The blade on the top unit is sharp. Be careful not to
cut yourself or others.
•To prevent a short circuit or an electric shock,
•do not use water to rinse the outside of the pot
unit or top unit (including the top unit handle,
control panel, upper plug, upper plug connector,
and the power cord connector) and keep them
away from drip or splash;
•do not immerse the top unit in water;
•do not immerse the base of the soymilk maker in
water.
•Use a microwave oven to heat up cold soymilk. Do
not use this appliance to heat it, as the contents will
stick to the inner side of the pot.
•Some foods may discolor the overflow sensor. This is
perfectly normal.
•Store the power cord in a cool and dry place.
•To prevent an electric shock, do not use the power
cord to connect other appliances.
Electromagnetic Fields (EMF)
•This Philips soymilk maker complies with all standards
regarding electromagnetic fields (EMF). If handled
properly and according to the instructions in this user
manual, the appliance is safe to use based on scientific
evidence available today.
For more recipes, you can visit Philips MyKitchen website www.philips.com/kitchen
Soymilk
Recipe Ingredients Cooking
Soymilk 75 g of dry beans (a full cup)
Wash and soak soybeans thoroughly. For details,
see the “Make soymilk” section.
Black bean milk 85 g of black beans (a full cup)
Five grains soymilk
Recipe Ingredients Cooking
Classic five grains soymilk
•15 g of soybeans (around 1/5 cup)
•20 g of rice (around 1/5 cup)
•20 g of millet (around 1/5 cup)
•15 g of oats (around 1/5 cup)
•10 g of wheat
Soak the soybeans thoroughly, wash the
ingredients. For details, see the “Make five grains
soymilk” section.
Red bean and millet milk
•50 g of read beans (around 1/2 cup)
•35 g of millet (around 2/5 cup)
•some sugar
Wash the red beans and millet and soak
thoroughly. For details, see the “Make five grains
soymilk” section.
Rice and soybeans milk
•30g of soybeans (around 1/2 cup)
•50 g of rice (around 1/2 cup)
•some sugar
Wash and soak soybeans thoroughly. Wash rice.
For details, see the “Make five grain soymilk”
section.
Pumkin soybeans milk
•35 g of soybeans (around 1/2 cup)
•35 g of pumpkin (around 1/2 cup)
Wash the soybeans and soak thoroughly.
Remove the pumpkin skin and cut the pumpkin
into 1 cm cubes. For details, see the “Make five
grains coymilk” section.
Sweet potato and
soybean milk
•40 g of sweet potato (around 1/2 cup)
•35 g of soybeans (around 1/2 cup)
Wash the soybeans and soak thoroughly.
Remove the sweet potato skin and cut the
sweet potato into 1 cm cubes. For details, see
the “Make five grains soymilk” section.
Mung bean and barley
paste
•35 g of barley (around 2/5 cup)
•35 g of mung beans (around 2/5 cup)
•20 g of rice (around 1/5 cup)
•10g of oats (around 1/5 cup)
Wash the ingredients. For details, see the “Make
five grains soymilk:” section.
Walnut and cashew paste
•35 g of rice (around 2/5 cup)
•35 g of millet (around 2/5 cup)
•flesh of 5 cashews
•flesh of 5 walnuts
•5-10 chinese dates (with stones removed)
•5-10 longans (with stones removed)
•some sugar
Wash rice and millet. Chop walnut flesh, chinese
dates, and longans into small pieces. For details,
see the “Make five grains soymilk” section.
Rice paste
Recipe Ingredients Cooking
Cashew paste
•150 g of cashews
•some milk and crystal sugar
Brown the cashews and make sure they are
around 1cm in size . Put it into the pot. Add
water up to the middle of MAX and MIN. After
connecting to the power, press Select to select
Rice Paste. Press Start to start processing. Once
done, the appliance will sound. Pour the cashew
paste to the cup and serve. Finally, add some
milk and sugar to taste.
Complete nutritious rice
paste
•35 g of rice (around 1/2 cup)
•15 g of millet (around 1/5 cup)
•10 g of black sesame seeds
•10 peanuts (with shells removed)
•flesh of walnuts
•5 chinese dates (with stones removed)
Wash rice and millet. Chop walnut flesh into
small pieces. For details, see the “Make rice
paste” section.
Barley and lily rice paste
•35 g of barley (around 2/5 cup)
•35 g of rice (around 2/5 cup)
•20 g of fresh lily bulbs
•some sugar
Wash the barley and rice. Wash and chop fresh
lily bulbs into small pieces. For details, see the
“Make rice paste” section.
Chinese yam and chinese
date rice paste
•50 g of rice (around 1/2 cup)
•30 g of chinese yam
•
5-10 chinese dates (with stones removed)
•some crystal sugar
Wash the chinese dates and rice. Remove the
skin of the chinese yam and cut it into 1 cm
cubes. For details, see the “Make rice paste”
section.
Sweet potato and
pumpkin rice paste
•30 g of sweet potato (around 1/2 cup)
•20 g of pumpkin (around 1/3 cup)
•35 g of rice (around 1/3 cup)
•35 g of millet (around 1/3 cup)
Wash millet and rice. Remove the skin of sweet
potato and pumpkin and cut them into 1 cm
cubes. For details, see the “Make rice paste”
section.
Peanut paste
•200 g of peanuts (with shell removed)
•50 g of rice
•some milk and crystal sugar
Brown the peanuts and make sure they are
around 1cm in size. Wash rice. Put the peanuts
into the pot first, then the clean rice. Ad water
up to the middle of MAX and MIN. After
connecting to the power, press Select to select
Rice Paste. Press Start to start processing. Once
done, the appliance will sound. Pour the peanut
paste to the cup and serve. Finally, add some
milk and sugar to taste.
Almond paste
•70 g of almonds
•30 g of rice
•some milk and crystal sugar
Brown the almonds and make sure they are
around 1cm in size. Wash rice. Put the almonds
into the pot first, then the clean rice. Ad water
up to the middle of MAX and MIN. After
connecting to the power, press Select to select
Rice Paste. Press Start to start processing. Once
done, the appliance will sound. Pour the almond
paste to the cup and serve. Finally, add some
milk and sugar to taste.
Sesame paste
•125 g of black sesame seeds
•25 g of white sesame seeds
•50 g of rice
•some milk and crystal sugar
Brown the black sesame seeds and the white
sesame seeds. Wash rice. Put both the black and
white sesame seeds into the pot first then put
the clean rice. Add water up to the middle of
MAX and MIN. After connecting to the power,
press Select to select Rice Paste. Press Start to
start processing. Once done, the appliance will
sound. Pour the sesame paste to the cup and
serve. Finally, add some milk and sugar to taste.
Walnut paste
•180 g of walnuts
•50 g of rice
•some milk and crystal sugar
Brown the walnuts and make sure they are
around 1cm in size. Wash rice. Put the walnuts
into the pot first, then put the clean rice. Ad
water up to the middle of MAX and MIN. After
connecting to the power, press Select to select
Rice Paste. Press Start to start processing. Once
done, the appliance will sound. Pour the sesame
paste to the cup and serve. Finally, add some
milk and sugar to taste.
Fruit/veggie drink
Recipe Ingredients Cooking
Banana milkshake
•400 g of banana
•300 ml of milk
Remove the skin of the bananas and cut them
into 1 cm cubes. For details, see the “Make fruit/
veggie drink” section.
This chapter summarizes the most common problems you could encounter with the appliance. If you are unable to solve the problem with the information
below, contact the Philips Consumer Care Center in your country.
Problem Possible cause Solution
The indicators do not light
up.
The upper plug is not plugged correctly. Make sure that the top unit is put into the pot correctly.
Too much ingredient is added. Put proper quantity of ingredient evenly at the bottom of the pot as instructed.
There is water in the top unit or the indicators
are broken.
Contact the Philips Consumer Care Center.
The indicators light up but
the appliance does not work.
You do not press Start. Press Start.
The power is disconnected during processing. Follow the instructions in this user manual.
The appliance is broken. Contact the Philips Consumer Care Center.
Processing will not stop. The appliance is broken. Contact the Philips Consumer Care Center.
The buttons do not work. The appliance is broken. Contact the Philips Consumer Care Center.
The beans or rice is not
ground well.
The voltage is too low. Use a household power regulator.
Too many beans are added.
Put proper quantity of ingredients as instructed in the “Use the appliance”
section.
Insufficient water is added.
Make sure that the water level is between MAX (the maximum level
indication) and MIN (the minimum level indication).
The machine is broken. Contact the Philips Consumer Care Center.
Overflow.
A wrong function was selected. Select a correct function.
Soymilk is too diluted or too many beans are
added.
Put proper quantity of ingredient as instructed in the “Use the appliance”
section.
The water level is above MAX (the maximum
level indication) and MIN (the minimum level
indication).
Make sure that the water level is between MAX (the maximum level
indication) and MIN (the minimum level indication).
The appliance is broken. Contact the Philips Consumer Care Center.
The overflow sensor is not cleaned. Clean the overflow sensor.
Problem Possible cause Solution
The time taken to process
soymilk is longer than
instructed, but other
functions work well.
The voltage is too low. User a household power regulator.
The water temperature is too low. Add warm water in ambient temperature.
Food is burnt.
A wrong function is selected. Select a correct function.
The inner side of the pot was not cleaned. Clean the inner side of the pot.
Insufficient water is added.
Make sure that the water level is between MAX (the maximum level
indication) and MIN (the minimum level indication).
Too much ingredient is added.
Put proper quantity of ingredient as instructed in the “Use the appliance”
section.
The beeps occur before
soymilk is ready.
Too much water or ingredient is added.
•Put proper quantity of ingredient as instructed in the “Use the appliance”
section.
•Make sure that the water level is between MAX (the maximum level
indication) and MIN (the minimum level indication).
The appliance is broken. Contact the Philips Consumer Care Center.
The sea level of your region is too high.
This appliance can only be used in regions no more than 2000m above mean
sea level.
The appliance begins stirring
once you press any button.
The appliance is broken. Contact the Philips Consumer Care Center.
Product information
Motor power: 150 W
Heating power: 900 W
Dimensions (L x W x H):
•Soymilk maker: 231.5 x 180 x 314.2 mm
•Packaging: 230 x 230 x 345 mm
Weight
•Net weight: 2.3 kg
•Gross weight: 2.9 kg
Capacity: 1000 - 1200 ml (for 2-4 servings)
For rated voltage and frequency information, refer to the
typeplate on the product.
Product information is subjected to change without prior
notice.
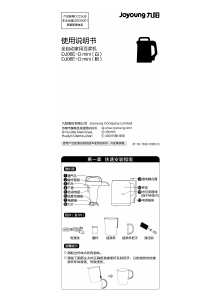
User manual 使用手冊

Loading…
常见问题
请给产品评分,告知您对飞利浦HD2061豆浆机看法。您是否希望分享对该产品的体验或提出问题?请在页面底部留言。有关本说明书的更多信息
我们知道,为您的 飞利浦HD2061豆浆机 提供纸质手册是件好事。 您随时可以从我们的网站下载该手册并自行打印。 如果您想要原始手册,我们建议您联系Philips。 他们也许能够提供原始手册。 您是否正在寻找其他语言版本的 飞利浦HD2061豆浆机 手册? 在我们的主页上选择您的首选语言并搜索型号以查看我们是否有可用。
规格
| 品牌 | Philips |
| 模型 | HD2061 |
| 类别 | 豆浆机 |
| 文件类型 | |
| 文件大小 | 2.68 MB |

加入有关该产品的对话
您可以在这里分享您对 飞利浦HD2061豆浆机 的看法。 如果您有疑问,请先仔细阅读手册。 可以使用我们的联系表索取手册。