说明书 卡西欧 CS-53P 音乐键盘架
需要您的 卡西欧 CS-53P 音乐键盘架 手册吗? 您可以在下面免费查看和下载中文版 PDF 手册。 该产品目前有 0 个常见问题,0 条评论,有 0 票。 如果这不是您想要的手册,请联系我们。
您的产品是否出现故障而说明书没能提供解决方案?请前往 Repair Café 以获得免费维修服务。
说明书
Loading…
日本語
安全上のご注意
このたびは、カシオ製品をお買い上げいただき、誠にありがとうございます。
• 組み立ての前に「安全上のご注意」をよくお読みの上、正しくお使いください。
• 本書は、お読みになった後も大切に保管してください。
絵表示について
この取扱説明書および製品への表示では、製品を安全に正しくお使いいただき、あなたや他の人々への危害や財産への損害を未
然に防止するため、いろいろな絵表示をしています。その表示と意味は次のようになっています。
Safety Precautions
Congratulations on your selection of the CASIO product.
• Before assembling the stand, be sure to carefully read through the instructions contained in this manual.
• Please keep all information for future reference.
Symbols : Various symbols are used in this operating manual and on the product itself to ensure that the product is used safely and
correctly, and to prevent injury to the user and other persons as well as damage to property. Those symbols along with their meanings are
shown below.
CASIO PIANO STAND
CS-53P
カシオピアノスタンド CS-53P
SOPORTE DEL PIANO CASIO CS-53P
CASIO PIANOSTÄNDER CS-53P
SUPPORT DE PIANO CASIO CS-53P
CASIO PIANOSTANDAARD CS-53P
SUPPORTO PER PIANO CASIO CS-53P
CASIO PIANOSTÄLLNING CS-53P
SUPORTE DE PIANO CASIO CS-53P
スタンドの組み立てかた
Assembly Instructions
Instrucciones de armado
Montageanleitung
Instructions d’assemblage
Montage aanwijzingen
Istruzioni per il montaggio
Monteringsanvisningar
Instruções de montagem
JESGFDISwPoCkArCS53WL1A
スタンドの組み立て方/ピアノ本体とスタンドの取り付け方
重要
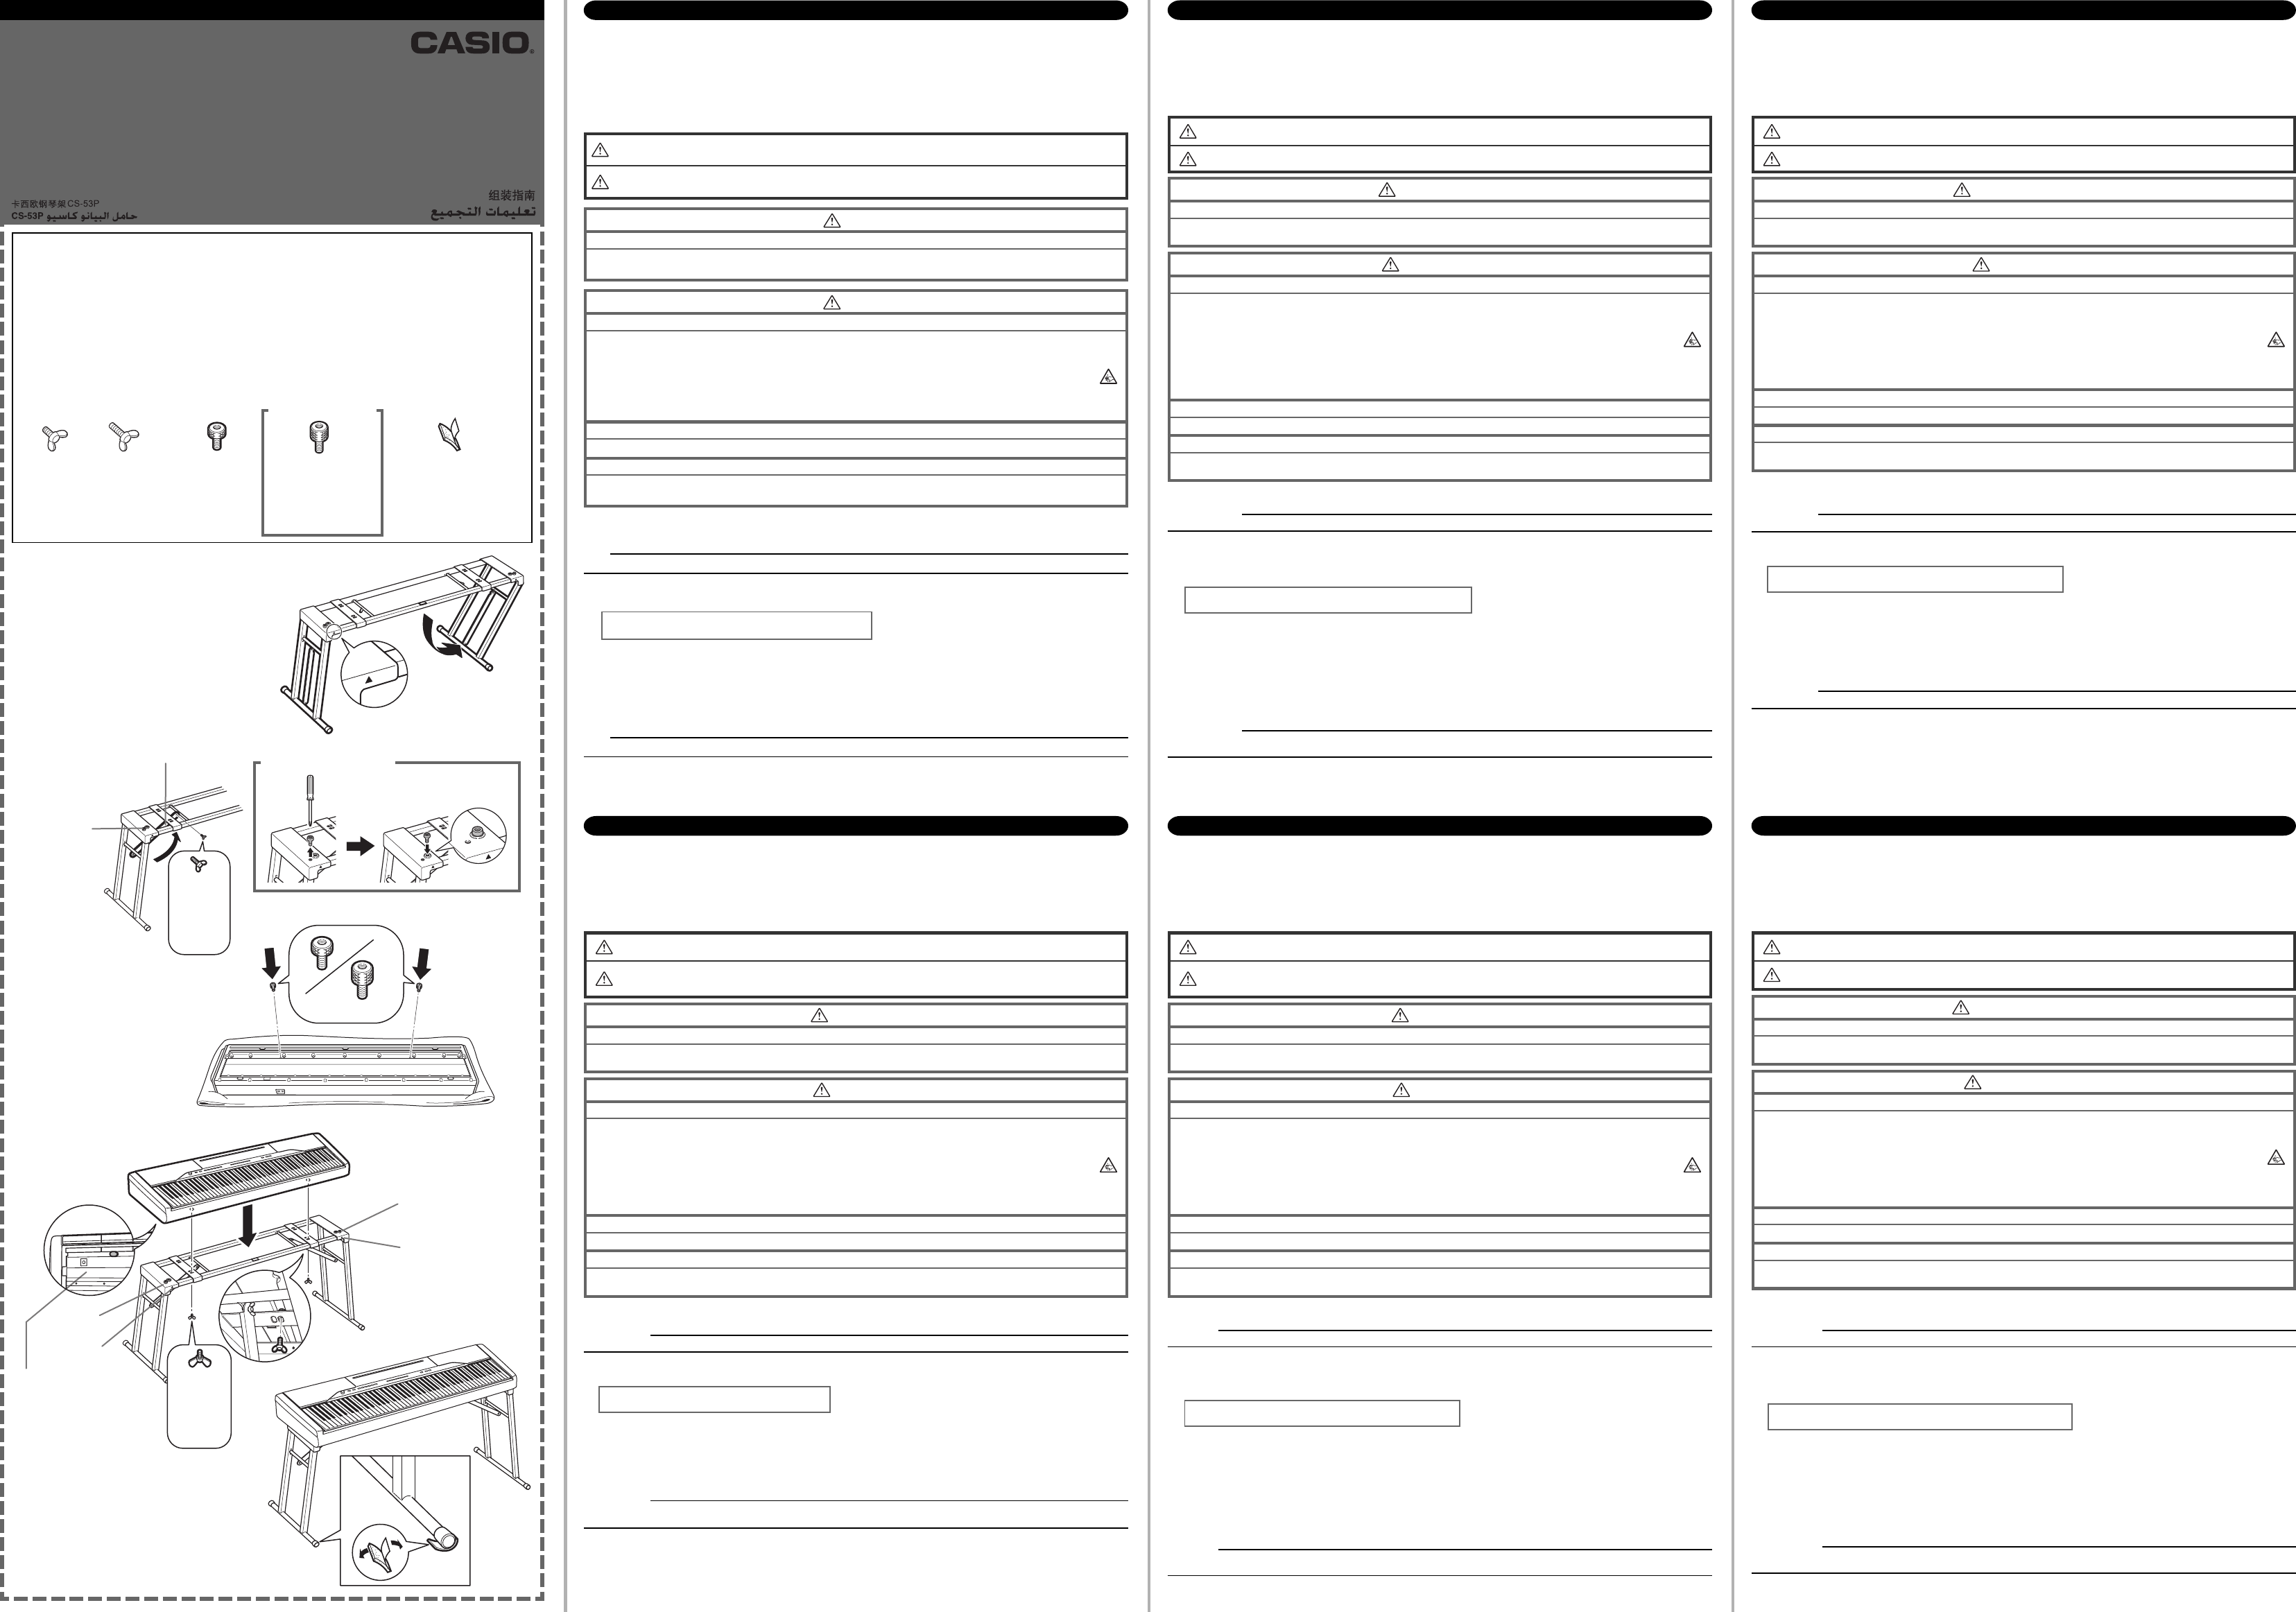
・組み立ては、必ず平らな場所で行ってください。
1
スタンド前面にある▲印を手前に向けて、スタンドの脚を広げます(図 1)。
2
左右の固定バーを手前から蝶ネジ(黒)で固定します(図 2)。
PX-100/PX-300/PX-500L をご利用の方へ
ゴムストッパーを図 2-
2
のように付け替えてください。
3
ピアノ本体の底面 2 箇所に本体取り付けボルトを取り付けます(図 3)。
• 取り付けは、柔らかいもの(毛布や座布団など)の上にピアノ本体を裏返しに置いて行ってください。
4
スタンドの上にピアノ本体をのせ、前後、左右の位置を合わせます(図 4)。
• 前後:ピアノ本体底面の溝にスタンド上面にある 2 箇所のゴムストッパーに合わせる(図 4 中の
쏆
)
• 左右:スタンド前面の両側にある▲印にピアノ底面のゴム足を合わせる(図 4 中の
★
)
5
スタンドとピアノ本体を蝶ネジ(シルバー)でしっかりと 2 箇所固定します(図 4)。
重要
・蝶ネジは必ず取り付けてください。取り付けないと、ピアノ本体がスタンドからずれたり落ちたりする恐れがあります。
★ スタンドにがたつきがある場合は、がたつき防止用スポンジを脚のパイプへ貼り付けてください(図 5)。
• スポンジの裏面に付いているテープをはがして貼り付けてください。
• スポンジを貼り付けるときは、必ずスタンドからピアノを降ろした状態で行ってください。
この表示を無視して誤った取扱いをすると、人が死亡または重傷を負う危険が想定される内容を
示しています。
この表示を無視して誤った取扱いをすると、人が傷害を負う危険が想定される内容および物的損
害のみの発生が想定される内容を示しています。
警 告
注 意
警 告
ピアノ本体やスタンドを不安定な場所に置かないでください。
ぐらついた台の上や傾いた所など、不安定な場所に置かないでください。落ちたり、倒れたりして、けがの原因となり
ます。
注 意
スタンドについて
●
組み立ての説明にしたがってしっかりと組み立ての上、ピアノ本体を正しく設置してご使用ください。ネジが
正しい位置にしっかりと固定されていなかったり、ピアノ本体の位置がずれていたりすると、スタンドが倒れ
たり、ピアノ本体が落ちたりして、けがの原因となることがあります。
●
組み立ての際は、手などをはさまないようご注意ください。
●
ピアノ本体は重いので、移動や設置は必ず二人以上で行ってください。
●
スタンドのネジが温度、湿度の変化や振動などの影響でゆるんでいないか、ときどき点検してください。ゆるん
でいたら、再度ネジをしっかりと締め直してください。ピアノ本体が落ちて、けがの原因となることがあります。
ピアノ本体に重いものを置かないでください。
ピアノ本体に重いものを置かないでください。倒れたり、落ちたりしてけがの原因となることがあります。
ピアノ本体やスタンドの上に乗らないでください。
ピアノ本体やスタンドの上に乗らないでください。特に、小さなお子様のいる家庭ではご注意ください。倒れたり、壊
れたりしてけがの原因となることがあります。
English
This indication stipulates matters that have the risk of causing death or serious injury if the product is
operated incorrectly while ignoring this indication.
This indication stipulates matters that have the risk of causing injury as well as matters for which there is
the likelihood of occurrence of physical damage only if the product is operated incorrectly while ignoring
this indication.
WARNING
CAUTION
WARNING
Do not place the piano or stand in a location that is unstable.
Do not place in an unstable location such as on a wobbly stand or inclined surface. This can cause the piano and stand to fall or
tip over resulting in injury.
Assemble the stand and mount the piano on it.
IMPORTANT!
• This stand should be assembled on a flat surface.
1
With the 왖 marks on the front of the stand facing towards you, extend the legs of the stand (Figure 1).
2
From the front of the stand, use two of the butterfly bolts (Black) to secure the left and right anchor bars in place (Figure 2).
Attention PX-100, PX-300, PX-500L users
Replace the rubber stopper as shown in Figure 2-
2
.
3
Screw the two piano installation bolts into the bottom of the piano (Figure 3).
• Turn the piano over and place it on a blanket or other soft item when screwing in the installation bolts.
4
Mount the piano onto the stand, making sure its front, back, left, and right sides are aligned properly (Figure 4).
• Front and Back: Align the grooves in the bottom of the piano with the two rubber stoppers on top of the stand (쏆 in Figure 4).
• Left and Right: Align the rubber feet on the bottom of the piano with the 왖 marks on the front of the stand ( in Figure 4).
5
Secure the piano to the stand with the two butterfly bolts (Silver) (Figure 4).
IMPORTANT!
• Be sure to install the butterfly bolts. If you don’t, the piano may fall from the stand, creating the risk of personal injury and damage to
the piano.
If the stand is unstable, affix the cushioning sponges on the pipes of the legs (Figure 5).
• Peel the tape from the back of the sponge to install it.
• Be sure to remove the piano from the stand before affixing the sponge.
CAUTION
Regarding the Stand
• Properly place the piano on the stand after securely assembling the stand in accordance with the instruction manual. If
the screws are not securely tightened at their correct locations, or if the piano itself is out of position, the stand may tip
over or the piano may fall off resulting in injury.
• Take care that you do not pinch your fingers between the piano and stand.
• Since the piano is quite heavy, movement and installation should be performed by at least two people.
• Periodically inspect the stand screws to check for looseness caused by changes in temperature or humidity and
vibrations and so on. If a screw has become loose, retighten it securely. If screws are not retightened when necessary,
the piano may fall off the stand resulting in injury.
Do not place heavy objects on the piano.
Do not place heavy objects on the piano. This may cause the piano to tip over or fall off the stand.
Do not sit on the piano or stand.
Do not sit on the piano or stand. This is particularly important in homes where there are young children. Sitting on the piano or
stand may cause it to tip over or break resulting in injury.
PRECAUCIONES RESPECTO A LA SEGURIDAD
Muchas gracias por seleccionar un instrumento musical electrónico CASIO.
• Antes de usar el instrumento, asegúrese de leer cuidadosamente las instrucciones contenidas en este manual.
• Guarde toda información para tener como referencia futura.
Símbolos : En este manual de operación y en el producto propiamente dicho, se usan varios símbolos para asegurar que el producto sea
usado de manera segura y correcta, y para prevenir de lesiones personales como así también de daños a la propiedad. Estos símbolos junto
con sus significados se muestran y explican a continuación.
Español
Esta indicación estipula la existencia de riesgos de muerte o lesiones serias, si el producto llega a operarse
incorrectamente al ignorarse esta indicación.
Esta indicación estipula la existencia de riesgos de lesiones, así también como la posibilidad de ocurrencia
de daños físicos, solamente si el producto se opera incorrectamente ignorándose esta indicación.
ADVERTENCIA
PRECAUCIÓN
ADVERTENCIA
No coloque el piano o soporte en un lugar que sea inestable.
No lo coloque en un lugar inestable tal como un soporte sin firmeza o superficie inclinada. Esto puede ocasionar que el piano y
soporte se vuelquen o caigan resultando en lesiones.
Arme el soporte y monte el piano sobre el mismo.
¡IMPORTANTE!
• Este soporte debe ser armado sobre una superficie plana.
1
Con las marcas 왖 en la parte delantera del soporte orientada hacia su posición, extienda los apoyos del soporte
(Figura 1).
2
Desde la parte delantera del soporte, utilice dos de los pernos de aletas (negros) para asegurar las barras de
anclaje izquierda y derecha en posición (Figura 2).
Atención usuarios de PX-100, PX-300, PX-500L
Reemplace el tope de goma tal como se muestra en la Figura 2-
2
.
3
Atornille los dos pernos de instalación del piano en la parte inferior del piano (Figura 3).
• Dé vuelta el piano y colóquelo sobre una frazada u otro elemento blando cuando atornille los pernos de instalación.
4
Monte el piano sobre el soporte, asegurándose de que sus lados delantero, trasero, izquierdo y derecho se
encuentran alineados apropiadamente (Figura 4).
• Lado delantero y trasero: Alinee las ranuras en la parte inferior del piano, con dos topes de caucho en la parte superior del soporte
(쏆 en la Figura 4).
• Lado izquierdo y derecho: Alinee los apoyos de caucho en la parte inferior del piano, con las marcas 왖 en la parte delantera del
soporte ( en la Figura 4).
5
Asegure el piano al soporte con los dos pernos de aletas (plateados) (Figura 4).
¡IMPORTANTE!
• Asegúrese de colocar los pernos de aletas. Si no lo hace, el piano puede caerse desde el soporte, creando el riesgo de lesiones
personales y daños al piano.
Si el soporte está inestable, fije las esponjas de acolchado en las tuberías de los apoyos (Figura 5).
• Pele la cinta desde la parte trasera de la esponja para colocarla.
• Asegúrese de retirar el piano desde el soporte antes de fijar la esponja.
PRECAUCIÓN
En relación al soporte
• Coloque el piano adecuadamente sobre el soporte luego de armar el soporte de acuerdo con las instrucciones del
manual. Si los tornillos no se encuentran seguramente apretados en sus posiciones correctas, o si el piano propiamente
dicho está fuera de posición, el soporte puede volcarse o el piano puede caerse resultando en lesiones personales.
• Tenga cuidado de no aprisionar sus dedos entre el piano y soporte.
• Como el piano es bastante pesado, la manipulación e instalación debe ser realizada por lo menos por dos personas.
• Inspeccione periódicamente los tornillos del soporte para comprobar por flojedad ocasionada por los cambios en la
temperatura o humedad, vibraciones y otros fenómenos relacionados. Si un tornillo se llega a aflojar, vuelva a apretar
seguramente. Si los tornillos no son vueltos a apretar en el momento necesario, el piano o el soporte pueden caerse,
resultando en lesiones personales.
No coloque objetos pesados sobre el piano.
No coloque objetos pesados sobre el piano. Esto puede ocasionar que el piano se vuelque o caiga fuera del soporte.
No se siente encima del piano o soporte.
No se siente encima del piano o soporte. Esto es particularmente importante en hogares en donde hay niños pequeños.
Sentándose encima del piano o soporte puede ocasionar que el piano se vuelque o rompa resultando en lesiones personales.
VORSICHTSMASSNAHMEN HINSICHTLICH DER SICHERHEIT
Herzlichen Glückwunsch zu Ihrer Wahl dieses CASIO Produktes.
• Bevor Sie den Ständer montieren, lesen Sie bitte unbedingt die in dieser Anleitung enthaltenen Instruktionen aufmerksam durch.
• Bitte bewahren Sie danach diese Informationen für spätere Nachschlagzwecke sorgfältig auf.
Symbole : Verschiedene Symbole werden in dieser Bedienungsanleitung und am eigentlichen Produkt verwendet, um sicherzustellen,
dass das Produkt sicher und richtig verwendet wird und um Verletzungen des Anwenders und anderer Personen sowie Sachschaden zu
vermeiden. Diese Symbole und ihre Bedeutungen sind nachfolgend aufgeführt.
Deutsch
Damit werden Punkte angezeigt, die das Risiko von Todesfolge oder ernsthaften Verletzungen aufweisen,
wenn das Produkt unter Ignorierung dieser Anzeige falsch bedient wird.
Damit werden Punkte angezeigt, die das Risiko von Verletzungen aufweisen, sowie Punkte, für die die
Möglichkeit von Beschädigungen besteht, nur wenn das Produkt unter Ignorierung dieser Anzeige falsch
bedient wird.
WARNUNG
VORSICHT
WARNUNG
Das Piano oder den Ständer niemals an einem Ort aufstellen, der nicht stabil ist.
Nicht auf einem nicht stabilen Ort, wie z.B. auf einem wackeligen Ständer oder auf einer geneigten Fläche, aufstellen.
Anderenfalls können das Piano und der Ständer herunter- oder umfallen und zu Verletzungen führen.
Montieren Sie den Ständer, und bringen Sie das Piano darauf an.
WICHTIG!
• Sie sollten diesen Ständer auf einer flachen Unterlage montieren.
1
Mit der Markierung „왖“ auf der Vorderseite des Ständers gegen Sie gerichtet, ziehen Sie die Beine des Ständers
aus (Abbildung 1).
2
Von der Vorderseite des Ständers aus, verwenden Sie zwei der Flügelschrauben (schwarz), um die linken und
rechten Ankerstäbe zu sichern (Abbildung 2).
Zur Beachtung für Benutzer des PX-100, PX-300, PX-500L
Ersetzen Sie den Gummianschlag wie in Abbildung 2-
2
gezeigt.
3
Schrauben Sie die beiden Piano-Einbauschrauben in die Unterseite des Pianos (Abbildung 3).
• Drehen Sie das Piano um, und legen Sie es auf einer Decke oder anderen weichen Unterlage ab, wenn Sie die Einbauschrauben
hineinschrauben.
4
Montieren Sie das Piano auf dem Ständer, wobei Sie auf richtige Ausrichtung der vorderen, hinteren, linken und
rechten Seite achten müssen (Abbildung 4).
• Vorne und hinten: Richten Sie die Nuten an der Unterseite des Pianos mit den beiden Gummianschlägen auf der Oberseite des
Ständers aus (쏆 in Abbildung 4).
• Links und rechts: Richten Sie die Gummifüße an der Unterseite des Pianos mit den Markierungen „왖“ auf der Vorderseite des
Ständers aus ( in Abbildung 4).
5
Sichern Sie das Piano mit den zwei Flügelschrauben (silber) an dem Ständer (Abbildung 4).
WICHTIG!
• Installieren Sie unbedingt die Flügelschrauben. Anderenfalls kann das Piano von dem Ständer fallen und zu persönlichen Verletzungen
oder zu Beschädigung des Pianos führen.
Falls der Ständer instabil ist, bringen Sie die Dämpfungsschwämme an den Rohren der Beine an (Abbildung 5).
• Ziehen Sie die Schutzfolie von der Rückseite des Schwamms ab, um diesen anzubringen.
• Nehmen Sie unbedingt das Piano von dem Ständer, bevor Sie den Schwamm anbringen.
VORSICHT
Hinsichtlich des Ständers
• Das Piano richtig am Ständer anbringen, nachdem der Ständer gemäß Montageanleitung montiert wurde. Falls die
Schrauben nicht richtig an den vorgeschriebenen Positionen festgezogen werden oder das Piano nicht richtig
positioniert wird, kann der Ständer umkippen oder das Piano kann herunterfallen und zu Verletzungen führen.
• Achten Sie darauf, dass Ihre Finger nicht zwischen dem Piano und dem Ständer eingeklemmt werden.
• Da das Piano relativ schwer ist, sollten Transport und Installation von mindestene zwei Personen ausgeführt werden.
• Die Ständerschrauben regelmäßig überprüfen, um sicherzustellen, dass sich diese aufgrund von Temperatur- oder
Luftfeuchtigkeitsänderungen, Vibrationen usw. nicht gelöst haben. Lockere Schrauben sind richtig nachzuziehen. Falls
lockere Schrauben nicht richtig nachgezogen werden, kann das Piano vom Ständer fallen und zu Verletzungen führen.
Niemals schwere Gegenstände auf dem Piano ablegen.
Niemals schwere Gegenstände auf dem Piano ablegen. Anderenfalls kann das Piano umkippen oder vom Ständer herunterfallen.
Niemals auf dem Piano oder Ständer sitzen.
Niemals auf dem Piano oder Ständer sitzen. Dies ist besonders in Haushalten mit kleinen Kindern wichtig. Anderenfalls kann das
Piano oder der Ständer umfallen bzw. brechen, was zu Verletzungen führen kann.
PRÉCAUTIONS CONCERNANT LA SÉCURITÉ
Félicitations pour l’achat de ce produit CASIO.
• Avant d’assembler le support, lisez attentivement les instructions dans ce manuel.
• Conservez ces informations pour toute référence future.
Symboles : Différents symboles sont utilisés dans ce mode d’emploi et sur le produit proprement dit pour garantir un emploi correct et sûr,
et éviter toute blessure à l’utilisateur et à d’autres personnes ainsi que tout dommage matériel. Ces symboles et leur signification sont
indiqués ci-dessous.
Français
Cette indication avertit des risques de mort ou de blessures importantes si l’appareil n’est pas utilisé
correctement et si cette indication n’est pas respectée.
Cette indication avertit des risques de blessures et de la possibilité de dommage physique seulement, si
l’appareil n’est pas utilisé correctement et si cette indication n’est pas respectée.
AVERTISSEMENT
ATTENTION
AVERTISSEMENT
Ne pas installer le piano ou le support sur une surface instable.
Ne pas les installer à un endroit instable, comme une étagère bancale ou une surface inclinée. Le piano et le support pourraient
tomber ou être renversés et causer des blessures.
Montage du support et installation du piano.
IMPORTANT!
• Montez ce support sur une surface plane.
1
Déployez les pieds du support avec les repères 왖 situés à l’avant vers vous (Figure 1).
2
A l’avant du support, utilisez deux des vis papillon (noirs) pour fixer les barres d’ancrage gauche et droite (Figure 2).
A l’attention des utilisateurs des PX-100, PX-300, PX-500L
Remplacez la butée de caoutchouc comme indiqué sur la Figure 2-
2
.
3
Vissez les deux vis d’installation du piano au fond du piano (Figure 3).
• Avant de visser les vis d’installation, retournez le piano et posez-le sur une couverture ou autre matériau doux.
4
Installez le piano sur le support en veillant à ce que les côtés avant, arrière, gauche et droit soient correctement
alignés (Figure 4).
• Avant et arrière : Alignez les rainures au fond du piano sur les deux butoirs en caoutchouc situés en haut du support (쏆 sur la Figure 4).
• Gauche et droit : Alignez les pieds en caoutchouc en bas du piano sur les repères 왖 situés à l’avant du support ( sur la Figure 4).
5
Fixez le piano sur le support à l’aide des deux vis papillon (argent) (Figure 4).
IMPORTANT!
• Veillez à fixer les deux vis papillon. Sinon, le piano peut tomber du support et provoquer des blessures corporelles ou être endommagé.
Si le support est instable, fixez les tampons amortisseurs sur les tubulures des pieds (Figure 5).
• Pour installer les tampons amortisseurs, décollez la pellicule située au dos.
• Veillez à enlever le piano du support avant d’installer les tampons amortisseurs.
ATTENTION
A propos du support
• Posez convenablement le piano sur le support après avoir assemblé le support comme indiqué dans le mode d’emploi.
Si les vis ne sont pas serrées à fond et à l’endroit approprié, ou si le piano n’est pas posé correctement sur le support,
le support risque d’être renversé ou le piano de tomber et de causer des blessures.
• Veillez à ne pas vous coincer les doigts entre le piano et le support.
• Comme le piano est assez lourd, il doit être déplacé et installé par au moins deux personnes.
• Inspectez périodiquement les vis du support pour voir si elles ne se sont pas desserrées suite à des changements de
température et d’humidité. Si une vis est desserrée, resserrez-la à fond. Si les vis ne sont pas resserrées quand il faut,
le piano risque de tomber et de blesser des personnes.
Ne pas poser d’objets lourds sur le piano.
Ne pas poser d’objets lourds sur le piano. Le piano pourrait être renversé ou tomber du support.
Ne pas s’asseoir sur le piano.
Ne pas s’asseoir sur le piano. Cela vaut particulièrement pour les familles où il y a des enfants en bas âge. Le piano ou le support
pourrait être renversé ou se briser et causer des blessures.
VOORZORGSMAATREGELEN VOOR DE VEILIGHEID
Gefeliciteerd met uw keus van het CASIO product.
• Zorg ervoor de aanwijzingen in deze gebruiksaanwijzing aandachtig te lezen voordat u de standaard in elkaar probeert te zetten.
• Houd a.u.b. alle informatie bij de hand voor latere naslag.
Symbolen : Er zijn verschillende symbolen gebruikt in deze gebruiksaanwijzing en op het product zelf om er zeker van te zijn dat het
product veilig en op de juiste wijze gebruikt wordt en om zowel letsel bij de gebruiker en andere personen alswel schade aan eigendommen
te voorkomen. Deze symbolen met hun betekenis worden hieronder getoond.
Nederland
Deze aanduiding laat zaken zien die het risico op ernstig letsel of zelfs de dood met zich mee brengen
als het toestel onjuist bediend wordt en deze aanduiding genegeerd.
Deze aanduiding laat zaken zien die het risico op letsel of de kans op schade met zich mee brengen als
het toestel onjuist bediend en deze aanduiding genegeerd wordt.
WAARSCHUWING
VOORZICHTIG
WAARSCHUWING
Plaats de piano of de standaard nooit op een ondergrond die instabiel is.
Niet plaatsen op een instabiele plaats zoals een instabiele standaard of op een oneffen ondergrond. Hierdoor kan de piano of de
standaard omvallen hetgeen letsel kan veroorzaken.
Monteer de standaard en bevestig de piano er boven op.
BELANGRIJK!
• Deze standaard dient op een vlakke ondergrond te worden gemonteerd.
1
Trek de poten van de standaard uit (Afbeelding 1) terwijl de 왖 markeringen aan de voorkant van de standaard naar
u toe wijzen.
2
Gebruik twee van de vleugelmoeren (zwart) aan de voorkant van de standaard om de linker en rechter
verankeringsklemmen op hun plaats vast te maken (Afbeelding 2).
Gebruikers van de modellen PX-100, PX-300, PX-500L: Attentie
Plaats de rubberen stopnok terug zoals aangegeven in Afbeelding 2-
2
.
3
Schroef de twee pianomontagebouten in de onderkant van de piano (Afbeelding 3).
• Leg de piano op zijn kop op een deken of een andere zachte ondergrond wanneer u de installatiebouten inschroeft.
4
Monteer de piano op de standaard en let er daarbij op de voorkant, achterkant en linker en rechter zijkanten keurig
uitgelijnd zijn (Afbeelding 4).
• Voor- en achterkant: Breng de groeven aan de onderkant van de piano op één lijn met de twee rubberen stopnokken aan de bovenkant
van de standaard (쏆 in Afbeelding 4).
• Linker- en rechter zijkant: Breng de rubberen voetjes aan de onderkant van de piano op één lijn met de 왖 markeringen aan de
voorkant van de standaard ( in Afbeelding 4).
5
Bevestig de piano m.b.v. de twee vleugelmoeren (zilver) op de standaard (Afbeelding 4).
BELANGRIJK!
• Zorg er voor de vleugelmoeren te monteren. Indien u dat nalaat, kan de piano van de standaard afvallen hetgeen persoonlijk letsel en
schade aan de piano kan veroorzaken.
Mocht de standaard instabiel zijn, bevestig dan de kussensponsjes aan de pijpen van de poten (Afbeelding 5).
• Verwijder het oliepapier van de achterkant van een kussensponsje om het te bevestigen.
• Let er op eerst de piano van de standaard te halen voordat u een kussensponsje aanbrengt.
VOORZICHTIG
Betreffende de standaard
•
Plaats de piano stevig op de standaard na de standaard gemonteerd te hebben zoals beschreven in de gebruiksaanwijzing. Als
de schroeven niet correct aangedraaid zijn op de daavoor bedoelde plaatsen of als de piano zelf niet goed geplaatst is, kan de
standaard omvallen of kan de piano van de standaard vallen, hetgeen het risico op persoonlijk letsel met zich meebrengt.
• Let er op dat uw vingers niet tussen de piano en de standaard bekneld raken.
• Daar de piano behoorlijk zwaar is, dient het verplaatsen en het monteren door minstens twee personen te worden gedaan.
•
Controleer de schroeven waarmee de standaard vastzit geregeld op loszitten hetgeen veroorzaakt wordt door veranderingen in
temperatuur of vochtigheid en trillingen, e.d. Mocht een schroef los zitten, draai hem dan opnieuw stevig aan. Als de schroeven
niet aangedraaid worden terwijl dit nodig is, dan kan de pinao van de standaard afvallen hetgeen letsel kan veroorzaken.
Plaats nooit zware voorwerpen op de piano.
Plaats nooit zware voorwerpen op de piano. Hierdoor kan de piano met standaard omvallen of kan de piano van de standaard afvallen.
Niet op de piano of op de standaard zitten.
Niet op de piano of op de standaard zitten. Dit is in het bijzonder van belang bij families met (kleine) kinderen. Als men op de
piano of op de standaard zit kan deze overhellen en vallen hetgeen kan leiden tot letsel.
S55A-LEAF-001B
部品をご確認ください。
Check to make sure all the required parts are included.
Compruebe para asegurarse de que todas las partes requeridas están incluidas.
Überprüfen Sie, das aller erforderlichen Teile vorhanden sind.
Vérifiez si toutes les pièces nécessaires sont présentes.
Controleer dat alle benodigde onderdelen aanwezig zijn.
蝶ネジ
Butterfly bolts
Pernos de aletas
Flügelschrauben
Vis papillon
Vleugelmoeren
本体取り付けボルト
Piano installation bolts
Pernos de instalación de piano
Piano-Einbauschrauben
Vis d’installation du piano
Pianomontagebouten
がたつき防止用スポンジ
Cushioning sponges
Esponjas de acolchado
Dämpfungsschwämme
Tampons amortisseurs
Kussensponsjes
쎹3
図1
Figure 1
Figura 1
Abbildung 1
Figure 1
Afbeelding 1
図2
Figure 2
Figura 2
Abbildung 2
Figure 2
Afbeelding 2
固定バー
Anchor bars
Barras de anclaje
Ankerstangen
Barres d’ancrage
Verankeringsklemmen
ゴムストッパー
Rubber stopper
Tope de caucho
Gummianschlag
Butoirs en caoutchouc
Rubber stopnok
1
図3
Figure 3
Figura 3
Abbildung 3
Figure 3
Afbeelding 3
[PX-100/PX-300/PX500L]
図5
Figure 5
Figura 5
Abbildung 5
Figure 5
Afbeelding 5
図4
Figure 4
Figura 4
Abbildung 4
Figure 4
Afbeelding 4
溝
Groove
Ranura
Nut
Rainure
Groef
쎹2
(シルバー)
(Silver)
(Plateado)
(Silber)
(Argent)
(Zilver)
쎹2 쎹2
(シルバー)
(Silver)
(Plateado)
(Silber)
(Argent)
(Zilver)
(黒)
(Black)
(Negro)
(Schwarz)
(Noir)
(Zwart)
2 [PX-100/PX-300/PX-500L]
(シルバー)
(Silver)
(Plateado)
(Silber)
(Argent)
(Zilver)
(黒)
(Black)
(Negro)
(Schwarz)
(Noir)
(Zwart)
쎹2
(黒)
(Black)
(Negro)
(Schwarz)
(Noir)
(Zwart)
[PX-100/PX-300/PX-500L]
CS53P_JESGFD_01.p65 05.6.8, 4:30 PMPage 1 Adobe PageMaker 6.5J/PPC

Loading…
常见问题
请给产品评分,告知您对卡西欧 CS-53P 音乐键盘架看法。您是否希望分享对该产品的体验或提出问题?请在页面底部留言。有关本说明书的更多信息
我们知道,为您的 卡西欧 CS-53P 音乐键盘架 提供纸质手册是件好事。 您随时可以从我们的网站下载该手册并自行打印。 如果您想要原始手册,我们建议您联系Casio。 他们也许能够提供原始手册。 您是否正在寻找其他语言版本的 卡西欧 CS-53P 音乐键盘架 手册? 在我们的主页上选择您的首选语言并搜索型号以查看我们是否有可用。
规格
| 品牌 | Casio |
| 模型 | CS-53P |
| 类别 | 音乐键盘架 |
| 文件类型 | |
| 文件大小 | 0.83 MB |
加入有关该产品的对话
您可以在这里分享您对 卡西欧 CS-53P 音乐键盘架 的看法。 如果您有疑问,请先仔细阅读手册。 可以使用我们的联系表索取手册。