说明书 Led LenserM8闪光灯
需要您的 Led LenserM8闪光灯 手册吗? 您可以在下面免费查看和下载中文版 PDF 手册。 该产品目前有 3 个常见问题,0 条评论,有 3 票,平均产品评分为 100/100。 如果这不是您想要的手册,请联系我们。
您的产品是否出现故障而说明书没能提供解决方案?请前往 Repair Café 以获得免费维修服务。
说明书
Loading…
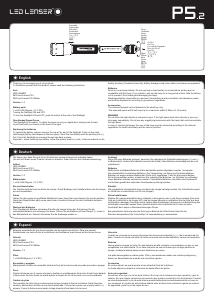
M8
On/Off
An/ Aus
Encendido/
Apagado
Marche/Arrêt
Aan/Uit
オン/オフ
켜짐/꺼짐
开/关
Close
Schließen
Cerrar
Fermer
Sluiten
閉める
닫다
关闭
Open
Önen
Abrir
Ouvrir
Open
開ける
열다
打开
Focusable
Fokusierbar
Enfocable
Focalisable
Focuseerbaar
フォーカス
포커스
调焦
1308000001
LED LENSER®*
* English
* Deutsch
* Espanol
Thank you for choosing one of our products.
To familiarize yourself with this product, please read the following instructions.
Item
LED LENSER
8308 Led Lenser M8
8508 Led Lenser M8 blister
Version 2.1
Battery
2xCR123A lithium battery (3V DC) ( Item No. 7759)
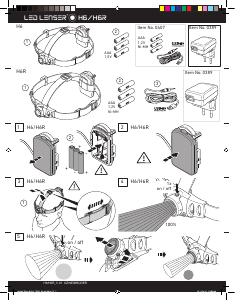
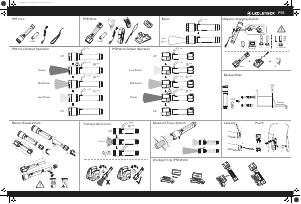
Turning the flashlight ON and OFF
To turn the flashlight ON and OFF, push the button at the end of the flashlight. When using on the road, please follow the national regulations.
The M8 is equipped with our Smart Light Technology (SLT). By using a microcontroller the illumination of the LED is controlled and different light programs and
light functions can be used. Due to a single button, the interface features a simple, user friendly design which means that the operator can always activate the
light on the max brightness setting. The flashlight has various different light output functions. There are two Energy Modes, three light programs and eight light
functions. The button at the end of the flashlight is used to turn the device ON and OFF and to choose between the different modes. There are three ways of
using the button. You can switch, you can touch (the button is lightly pressed just once without being fully depressed and the flashlight retains its previous setting
when the button is released) and keep touched.
Energy Modes
By choosing one of the energy modes (Energy Saving or Constant Current) you take a decision concerning the way of using the energy of the batteries.
1. Energy Saving: This mode allows the flashlight to control the light output by its built in Smart Light Technology (SLT). The light output will be adapted to the
real life behaviour of normal flashlight usage.
2. Constant Current: This mode allows the continuous use of all light programs with constant light output, just regulated by the built in control unit.
In both Energy Modes the brightness of the light function Boost and Power (100%) remains at a constant level for approximately 2 minutes and then drops in the
following 5 minutes in the Constant Current Mode to approx. 60% of the brightness and to approx. 50% in the Energy Saving Mode. 60% in the Energy Mode
Constant Current remain until the battery is empty. 50% of the maximum brightness in the Energy Saving Mode remain for approx. 25 minutes and then drop to
15%. This 15% brightness remains until the battery is empty. To change between the two Energy Modes you have to touch the button 8 times and then press the
button fully within 5 seconds.
If you change to the Energy Mode Energy Saving the flashlight indicates this by starting bright and dimming down until it turns off after 3 sec.
If you change to the Energy Mode Constant Current the flashlight indicates this by starting bright and turning off suddenly after 3 seconds.
Light programs and light functions
You can choose one of the three light programs (1. Professional, 2. Easy, 3. Defence) and the light functions. When the flashlight is off, touch the button 4 times
and then turn the flashlight on. Once the activation is successful the flashlight will confirm your choice by flashing the number of the corresponding activated light
program.
1. Professional:
When you are in this light program the flashlight starts with the light function Power (100%) when it is switched on, just like in all other three light programs.
Then you have two options. You can touch the button to activate the 15% brightness of the light function Dim. Alternatively keep the button touched for
continuous dimming and choose the required brightness by releasing the button. Continuing to touch the button will eventually take you to the other light
functions of this light program. First comes the light function Blink (3Hz), then S.O.S. and finally Defence Strobe (20Hz). As the sequence of the light functions in
all light programs revolves, the next time you touch the button you return to the light function Power (100%).
As in all other light programs for turning off the flashlight you only need to press the button, no matter which light function you are currently in.
2. Easy:
We included the light program Easy for all the users who prefer a very easy light program without too many light functions. As in the light program Professional
the light program Easy starts with the light function Power (100%) and then you have two options. You can touch the button to activate the 15% brightness of the
light function Dim. Alternatively keep the button touched for continuous dimming and choose the required brightness by releasing the button. In the light program
Easy, there are no other light functions so you return to the light function Power (100%) by touching the button again. The sequence of light functions revolves
and to turn off the flashlight simply press the button.
3. Defence:
We included this light program for all users who prefer a very simple light program with fast access to the light function Defence Strobe. The only difference
between the light program Defence and Easy is that the light function Dim has been replaced by Defence Strobe (20Hz). The sequence of the light functions
revolves when you touch the button and you turn the flashlight off by simply depressing the button.
Light function Boost
When the flashlight is in OFF-position, touch the button to use the light function Boost. Boost is independent of the activated light program.
One-Handed Speed-Focus
This flashlight is focusable. To adjust the beam to suit your application, simply push forward or pull back with your thumb on the head of the flashlight. Each
position of the focus can be locked by using the Fast Lock function by turning the head of the flashlight to the left. In order to re-adjust the beam, unlock the
focus by turning the head of the flashlight to the right. Then the Speed Focus function can be used again.
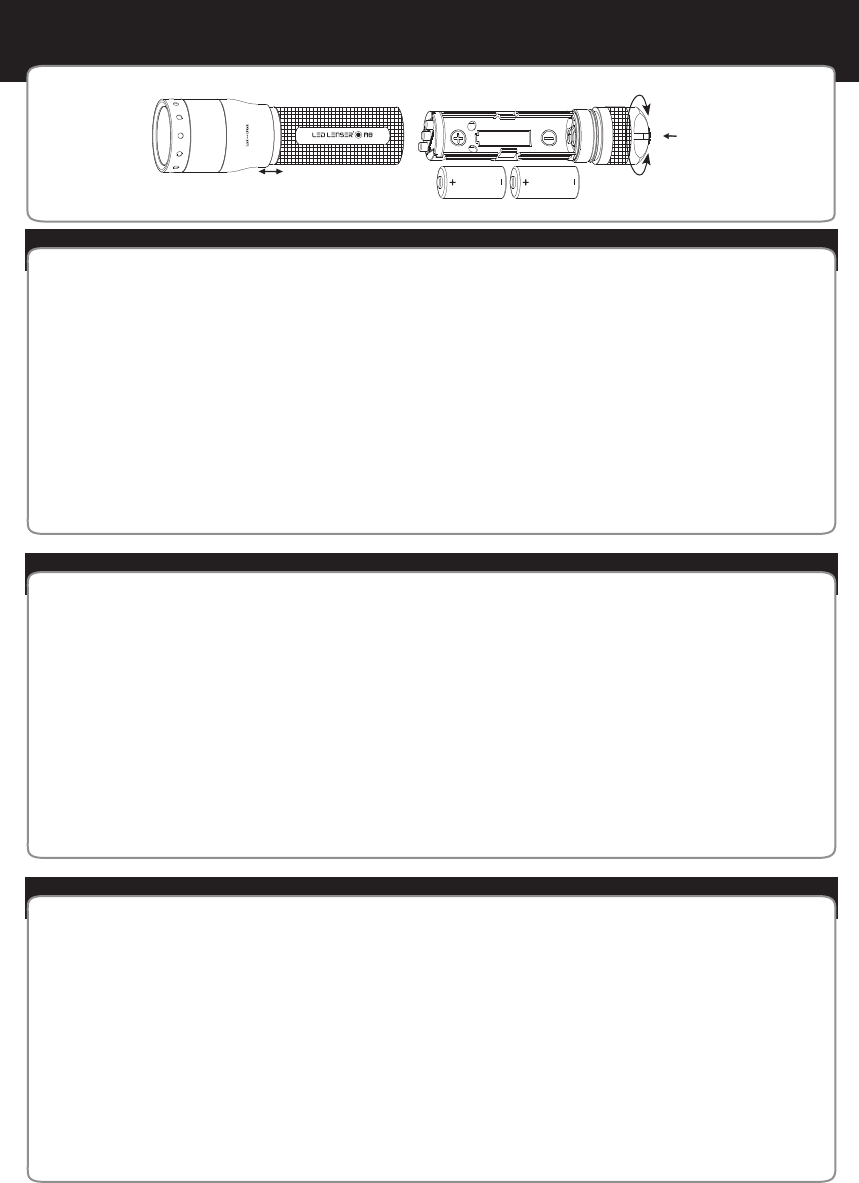
Replacing the battery
Regardless of which Energy Management Mode you choose, 5-15 minutes before the battery energy empty, the flashlight will signal low batteries by blinking
with 3Hz frequency 3 times every 10 seconds. Changing the battery does not have an effect on the modes that have been chosen before. To replace the battery,
switch off the flashlight and then unscrew the cap at the end. Take out the used battery and dispose of it correctly. Insert the new battery according to the polarity
marks (+) and (-). Close the flashlight by screwing the end cap back in place.
Important - when inserting the battery, follow the polarity marks (+) and (-) that are marked on the battery housing. If you insert batteries the wrong way, there
may be the risk of batteries damage or maybe an explosion!
Batteries
Never try to recharge batteries or use fresh and used batteries together. Always change all batteries at the same time and use high quality batteries and the
same type only. If you do not intend to use the flashlight for a long period of time, remove the batteries and store them in a cool place (not in the fridge) to extend
their lifetime and to prevent them from leaking and damaging the flashlight. Used batteries are hazardous waste and must be disposed according to legal
regulations.
WARNING
Do not shine the light directly in someone's eyes. If the light beam shines directly in your eye, look away immediately. Do not use any magnifying instruments
with this flashlight that could concentrate the light beam.
If used for commercial purposes, the flashlight should only be used in accordance with any local laws and regulations.
Wir freuen uns, dass Sie sich für ein Produkt aus unserem Hause entschieden haben. Um sich mit Ihrem neuen Produkt vertraut zu machen, finden Sie hier eine
Gebrauchsanleitung.
Artikel
LED LENSER
8308 Led Lenser M8
8508 Led Lenser M8 Blister
Version: 2.1
Batteriesatz:
2×CR123A Lithium Batterien (3V DC) (Art.-Nr. 7759)
Ein- und Ausschalten
Zum Ein- und Ausschalten drücken Sie bitte den Schalter am Ende der Taschenlampe. Bei der Verwendung im Straßenverkehr beachten Sie bitte die jeweiligen
gesetzlichen Bestimmungen.
Die M8 ist mit unserer Smart Light Technology (SLT) ausgestattet. Durch die Verwendung eines Mikrocontrollers kann die Lichtstärke der LED gesteuert und
verschiedene Lichtprogramme und Lichtfunktionen genutzt werden. Indem ein Einzelschalter verwendet wurde, konnte die Schnittstelle einfach und anwenderfreundlich
gestaltet werden. Die Taschenlampe kann dem Nutzer Licht verschiedener Stärken und auf verschiedene Art und Weise bereitstellen. So stehen zwei Energy Modes, drei
Lichtprogramme und eine Menge an Lichtfunktionen zur Verfügung. Um die Taschenlampe an- und auszuschalten und um die verschiedenen Modi auszuwählen, wird der
Schalter am Ende der Taschenlampe verwendet. Hierbei kann der Schalter auf drei Arten benutzt werden. Der Schalter kann geschaltet werden, er kann nur kurz
angetippt werden (d.h. der Schalter wird einmal leicht gedrückt, ohne dass der Druckpunkt erreicht wird, sodass nach dem Antippen die gleiche Schalterstellung erreicht
wird wie vor dem Antippen) und als drittes kann der Schalter für eine längere Zeit angetippt gehalten werden.
Energy Modes
Durch die Wahl eines der beiden Energy Modes (Energy Saving oder Constant Current) fällt der Anwender eine Entscheidung darüber, wie die in den Batterien
enthaltene Energie genutzt wird.
1. Energy Saving: Durch die eingebaute Smart Light Technology (SLT) wird die Lichtstärke gesteuert. Die Helligkeit ist an reale Bedingungen, die bei einer normalen
Verwendung der Lampe auftreten, angepasst.
2. Constant Current: Dieser Mode erlaubt den kontinuierlichen Gebrauch aller Lichtprogramme mit konstanter Lichtstärke. Die Helligkeit wird nur über die eingebaute
Kontroll-Einheit reguliert.
In beiden Energy Modes bleibt die Helligkeit in der Lichtfunktion Boost und Power (100%) für ca. 2 Minuten konstant und fällt dann in den nächsten 5 Minuten auf ca. 60%
der Helligkeit (Constant Current) bzw. Auf 50% im Energy Saving Mode ab. Die 60% im Constant Current bleiben eingestellt bis die Batterien leer sind. Im Energy Saving
Mode bleiben die 50% Helligkeit für ca. 25 Minuten erhalten und fallen dann auf 15%. Diese 15% stehen zur Verfügung, bis die Batterien leer sind. Um zwischen den
beiden Energy Modes zu wechseln, tippen Sie den Schalter acht Mal an und schalten dann innerhalb 5 Sekunden.
Wenn Sie zum Energy Saving Mode wechseln, bestätigt die Lampe das, indem sie nach dem Schalten hell leuchtet und dann innerhalb 3 Sekunden herunter dimmt.
Wenn Sie zum Constant Current Mode wechseln, bestätigt die Lampe das, indem sie nach dem Schalten hell leuchtet und nach 3 Sekunden schlagartig ausgeht.
Lichtprogramme und Lichtfunktionen
Sie können eins der drei Lichtprogramme (1. Professional, 2. Easy, 3. Defence) und die Lichtfunktionen auswählen.
Um zwischen den drei Lichtprogrammen zu wechseln, müssen Sie, wenn die Lampe aus ist, den Schalter vier Mal antippen und die Lampe direkt einschalten. Eine
korrekte Aktivierung bestätigt die Lampe mit einer korrespondierenden (1x, 2x oder 3x) Anzahl von Aufblitzen.
1. Professional:
Wenn Sie dieses Lichtprogramm ausgewählt haben, startet die Lampe, genauso wie in den anderen Lichtprogrammen nach dem Einschalten mit der Lichtfunktion Power
(100%). Dann haben Sie zwei Optionen. Wenn Sie den Schalter kurz antippen, haben Sie direkten Zugriff auf 15% Helligkeit der Lichtfunktion Dim. Oder Sie halten den
Schalter angetippt für stufenloses Dimmen und arretieren die gewünschte Helligkeit durch einfaches Loslassen des Schalters. Durch weiteres Antippen gelangen Sie zu
den anderen Lichtfunktionen dieses Lichtprogramms. Es beginnt mit Blink (3Hz), gefolgt von der S.O.S. und als letzte Lichtfunktion kommt Defence Strobe (20Hz). Da die
Reihenfolge der Lichtfunktionen in allen Lichtprogrammen revolvierend ist, starten Sie auch hier mit einem weiteren Antippen wieder mit Power (100%).
Wie bei allen Lichtprogrammen können Sie unabhängig von der augenblicklich genutzten Lichtfunktion die Lampe durch einfaches Betätigen des Schalters ausschalten.
2. Easy:
Das Lichtprogramm Easy wurde für alle Anwender integriert, die ein Lichtprogramm ohne viele Lichtfunktionen vorziehen. Wie beim Lichtprogramm Professional startet
auch Easy mit der Lichtfunktion Power (100%), und auch hier haben Sie dann zwei Optionen. Sie können entweder durch kurzes Antippen direkt 15% Helligkeit der
Lichtfunktion Dim nutzen oder aber Sie halten den Schalter angetippt für stufenloses Dimmen und Arretieren der gewünschten Helligkeit durch einfaches Loslassen des
Schalters. Da es keine weiteren Lichtfunktionen im Lichtprogramm Easy gibt, gelangen Sie durch ein weiteres kurzes Antippen des Schalters wieder zur Lichtfunktion
Power (100%). Die Reihenfolge der Lichtfunktionen ist revolvierend und einfaches Schalten schaltet die Lampe aus.
3. Defence:
Dieses Lichtprogramm wurde für alle Anwender integriert, die ein sehr einfaches Lichtprogramm wünschen, das einen schnellen Zugriff auf die Lichtfunktion Defence
Strobe ermöglicht. Der einzige Unterschied zwischen dem Lichtprogramm Defence und Easy ist, dass die Lichtfunktion Dim durch Defence Strobe (20Hz) ersetzt wurde.
Auch hier ist die Reihenfolge der Lichtfunktionen revolvierend, und die M8 kann
aus jeder Lichtfunktion heraus durch Schalten ausgeschaltet werden.
Lichtfunktion Boost
Wenn die Taschenlampe aus ist, tippen Sie einfach den Schalter an oder halten Sie ihn angetippt, um die Lichtfunktion Boost zu nutzen. Boost ist unabhängig vom
aktivierten Lichtprogramm.
Fokus
Die Taschenlampe ist über den sogenannten Speed Focus fokussierbar. Halten Sie die Taschenlampe am geriffelten Mittelteil mit einer Hand fest und schieben Sie mit
der anderen Hand den Objektivtubus nach vorne oder hinten. Hierdurch können Sie den Lichtstrahl stufenlos nach Ihren Wünschen einstellen. Jede Stellung des Fokus
kann arretiert werden, indem der sogenannte Fast Lock verwendet wird und der Kopf der Taschenlampe nach links gedreht wird. Um den Fokus wieder verstellen zu
können, muss der Kopf zur anderen Seite gedreht werden.
Wechseln der Batterien
Unabhängig vom gewählten Energy Mode signalisiert die Taschenlampe ein kurz bevorstehendes (5 – 15 Minuten vorher) Zuneigegehen der Energie durch dreimaliges
Blinken mit 3Hz alle 10 Sekunden. Ein Wechsel der Batterien hat keinen Einfluss auf den gewählten Energy Mode. Zum Wechseln der Batterien schalten Sie unbedingt
zuerst die Taschenlampe aus und schrauben die Taschenlampe hinten auf. Wenn Sie neue Batterien einlegen, beachten Sie unbedingt die Polaritätsmarkierungen (+)
und (-) im Batteriefach. Schließen Sie das Lampengehäuse wieder indem Sie die Endkappe wieder einschrauben.
Achtung – Wenn Sie neue Batterien einlegen, beachten Sie unbedingt die Polaritätsmarkierungen (+) und (-) im Batteriefach. Andernfalls, wenn Sie die Batterien falsch
einlegen, besteht die Gefahr, dass Batterien beschädigt werden und explodieren!
Batterien
Versuchen Sie niemals normale Batterien wieder aufzuladen. Wechseln Sie immer alle Batterien gleichzeitig und entsorgen Sie sie vorschriftsmäßig. Verwenden Sie
niemals frische und gebrauchte Batterien zusammen. Verwenden Sie ausschließlich hochwertige Batterien desselben Typs. Falls Sie die Taschenlampe längere Zeit
nicht verwenden wollen, entnehmen Sie unbedingt die Batterien und lagern Sie diese an einem kühlen Ort (nicht im Kühlschrank), um die Lebensdauer zu verlängern und
Schäden und auslaufende Batterien zu vermeiden. Leere Batterien müssen entnommen werden. Verbrauchte Batterien sind Sondermüll und müssen gemäß der
nationalen Gesetzgebung entsorgt werden.
Sicherheitshinweis
Richten Sie niemals absichtlich den Lichtstrahl in die eigenen oder in die Augen anderer Personen. Falls ein Lichtstrahl in die Augen trifft, sind die Augen bewusst zu
schließen und der Kopf aus dem Lichtstrahl zu bewegen. Es dürfen keine optisch stark bündelnden Instrumente zur Betrachtung des Lichtstrahls verwendet werden.
Wenn jemand direkt in den Lichtstrahl blickt, kann die hohe Leuchtkraft der Lampe zu Blenderscheinungen führen. Bei gewerblicher Nutzung oder der Nutzung im Bereich
der öffentlichen Hand ist der Benutzer abhängig vom Einsatzfall entsprechend aller anzuwendenden Gesetze und Vorschriften zu unterweisen.
Gracias por elegir uno de nuestros productos.
Para familiarizarse con este artículo, por favor lea las siguientes instrucciones.
Artículo
LED LENSER
8308 Led Lenser M8
8508 Led Lenser M8 blister
Version: 2.1
Batería
2 x CR 123A Litio (3V DC) (Art. Nº 7759)
Encendido y apagado
Para encender y apagar la linterna presione el botón situado al final de la misma. Cuando se use en carretera, siga las normas nacionales.
La M8 está equipada con nuestra Tecnología de Luz Inteligente. La iluminación del LED es controlada por un micro-procesador y pueden usarse diferentes programas y
funciones de luz. Usando un solo interruptor, la interfaz del usuario ha sido diseñada para ser simple y permitir siempre que el usuario active la luz en el máximo brillo.
Puede ofrecer varias clases de rendimiento de luz. Hay dos Modos de Administración de la Energía, tres programas de Luz y ocho funciones. Para encender y apagar la
linterna y para elegir los diferentes modos se usa el interruptor situado al final de la linterna. Hay tres formas de usar el interruptor: 1) Se puede presionar hasta que haga
clic, 2) se puede tocar sin que haga clic (esto significa que el interruptor es presionado una vez ligeramente sin alcanzar su punto de presión -sin hacer clic-, cuando
usted deja de tocar el interruptor permanece en el mismo punto que antes) y 3) pulsar sin hacer clic y mantener.
Modos de Administración de la Energía
Eligiendo uno de los dos Modos de Administración de la Energía usted toma una decisión respecto de la foma de usar la energía de las baterías/acumuladores.
1. Modo de Ahorro de Energía: Este modo permite que la linterna controle la salida de luz por su Tecnología de Luz Inteligente incorporada. La salida de luz se adaptará
al funcionamiento en la vida real del uso de una linterna normal.
2. Modo de Corriente Constante: Este modo permite el uso continuo de todos los porgramas de luz con salida de luz constante, sólo regulada por la unidad de control
incorporada.
En ambos Modos de Administración de la Energía el brillo de la Función de Estimulación y Potencia (100%) permanece en un nivel constante por aproximadamente 2
minutos y luego cae en los siguientes 5 minutos en el Modo de Corriente Constante hasta aproximadamente el 60% de la luminosidad máxima y hasta aproximadamente
el 50% en el Modo de Ahorro de Energía. El 60% en el Modo de Corriente Constante permanece hasta que las baterías se agotan. El 50% del brillo máximo en el Modo
de Ahorro de Energía permanece por aproximadamente 25 minutos y luego cae al 15%. Este 15% de brillo permanece hasta que las baterías se agotan. Para cambiar
entre los dos Modos de Administración de la Energía usted tiene que tocar el interruptor 9 veces y luego presionar hasta hacer clic dentro de 5 segundos.
En caso de que usted cambiara al Modo de Ahorro de Energía la linterna indica esto arrancando brillante y disminuyendo el brillo hasta apagarse después de 3
segundos.
En caso de que usted cambiara al Modo de Corriente Constante la linterna indica esto arrancando brillante y apagándose de pronto después de 3 segundos.
Programas y Funciones de Luz
Se puede elegir uno de los tres programas de Luz (1. Profesional, 2. Fácil y 3. Defensa) y las Funciones de luz. Cuando la linterna está apagada, toque 4 veces el
interruptor y luego encienda la linterna. Después de una activación exitosa la linterna lo confirmará con un número de destellos correspondientes al programa de luz
activado.
1, Profesional:
Cuando se está en este programa la linterna empieza con la Función Potencia (100%) cuando es encendida, igual que en los otros tres programas de luz. Entonces
usted tiene dos opciones. Puede tocar el interruptor para activar el 15% de brillo en la Función Regulación. La otra posibilidad es tocar y mantener tocado para que la luz
vaya decreciendo y elegir el brillo deseado soltando el interruptor. Entonces cada nuevo toque le permite pasar a las otras funciones de este programa de Luz. Empieza
con la Función Parpadeo (3Hz), la siguiente es la Función S.O.S. y la última es la Función Estroboscopio (20Hz). La secuencia de los Modos de Luz es giratoria de
modo que la próxima vez que toque el interruptor le traerá nuevamente a la Función Potencia (100%).
Como en todos los otros programas de Luz para apagar la linterna sólo necesita presionar el interruptor, sin importar qué función está utilizando en ese momento.
2, Fácil:
Incluimos el programa de Luz Fácil para todos los usuarios que prefieran un programa de luz muy fácil sin muchas funciones. Como el programa de Luz Profesional, el
programa Fácil empieza con la Función Potencia (100%) y usted también tiene dos opciones. Puede tocar el interruptor para activar el 15% de brillo en la Función
Regulación. La otra posibilidad es tocar y mantener tocado para que la luz vaya decreciendo y elegir el brillo deseado soltando el interruptor. En el programa Fácil no hay
otras funciones así que usted regresa a la Función Potencia (100%) tocando el interruptor nuevamente. La secuencia de programas de luz es giratoria. Presionar el
interruptor para apagar la linterna.
3, Defensa:
Incluimos este programa de Luz para todas las personas que prefieren un programa de luz muy simple con rápido acceso a la Función Estroboscopio de Defensa. La
única diferencia entre los programas de luz Defensa táctica y Fácil es que la Función Regulación ha sido reemplazada por la Función Estroboscopio de Defensa (20Hz).
La secuencia de las funciones de luz es giratoria cuando usted pulsa el interruptor sin hacer clic. La linterna se apaga cuando usted presiona el interruptor hasta hacer
clic.
Función Estimulación
Cuando la linterna está apagada toque el interruptor y manténgalo tocado para usar la Función Regulación. La Función Regulación es independiente del programa de luz
activado.
Enfoque rápido con una mano
El enfoque de esta linterna puede ser regulado. Para ajustar el haz de luz adecuado a sus necesidades de aplicación, simplemente empuje hacia delante o atrás con su
pulgar sobre la cabeza de la linterna. Cada posición del enfoque puede ser bloqueada usando la función Bloqueo Rápido girando la cabeza de la linterna hacia la
izquierda. A fin de ajustar el haz de luz nuevamente usted puede desbloquear el enfoque girando la cabeza de la linterna hacia la derecha. Entonces la función Enfoque
Rápido puede usarse otra vez.
Cambio de baterías
El cambio de las baterías no afecta al modo de energía elegido. Entre 5-15 minutos antes de agotarse las baterías, la linterna indicará que las baterías están bajas
parpadeando 3 veces cada 10segundos con una frecuencia de 3Hz. El cambio de las baterías no afecta a los modos que se hayan elegido antes. Para cambiar las
baterías, apague la linterna y desenrosque la tapa situada al final de la linterna. Retire las baterías usadas (descargadas) y deshágase de ellas de forma adecuada.
Inserte las nuevas baterías de acuerdo con marcas de polaridad (+) y (-). Cierre la linterna enroscando la tapa final en su sitio.
Importante - Cuando se inserten las baterías seguir las marcas de polaridad (+) y (-) de la carcasa de las pilas. Si las baterías se colocan de forma incorrecta pueden
resultar dañadas.
Baterías
Nunca intente recargar las baterías o usar las nuevas y las gastadas juntas. Cambie siempre todas las baterías al mismo tiempo y utilice baterías de alta calidad y del
mismo tipo. Si no tiene intención de usar la linterna durante algún tiempo, quite las baterías para prevenir posibles pérdidas que puedan dañar la linterna y guárdelas en
un sitio fresco (no en la nevera) para prolongar su vida. Las baterías usadas son desechos peligrosos y deben de ser tratados de acuerdo con la legislación actual.
ADVERTENCIA
No enfocar directamente en los ojos. Si el haz de luz da en los ojos, volver la cabeza inmediatamente. No usar ningún instrumento de aumento con esta linterna que
pueda concentrar el haz de luz. En caso de uso comercial, el usuario de la linterna sólo debe utilizar este producto de acuerdo con la normativa vigente.

Loading…
常见问题
请给产品评分,告知您对Led LenserM8闪光灯看法。您是否希望分享对该产品的体验或提出问题?请在页面底部留言。有关本说明书的更多信息
我们知道,为您的 Led LenserM8闪光灯 提供纸质手册是件好事。 您随时可以从我们的网站下载该手册并自行打印。 如果您想要原始手册,我们建议您联系Led Lenser。 他们也许能够提供原始手册。 您是否正在寻找其他语言版本的 Led LenserM8闪光灯 手册? 在我们的主页上选择您的首选语言并搜索型号以查看我们是否有可用。
规格
| 品牌 | Led Lenser |
| 模型 | M8 |
| 类别 | 闪光灯 |
| 文件类型 | |
| 文件大小 | 2.66 MB |
Led Lenser闪光灯 的所有手册
闪光灯 的更多手册
关于 Led LenserM8闪光灯 的常见问题
我们的支持团队将搜索有用的产品信息并回答常见问题。如果您在常见问题中发现不准确的回答,请使用联系表格告知我们。
设备中的电池被氧化了,我仍可以安全使用吗? 验证
Ja,该设备仍然可以安全使用。首先,取出氧化电池。切勿徒手操作。然后用蘸有醋或柠檬汁的棉签清洁电池盒。晾干并插入新电池。
有帮助 (102) 阅读更多
加入有关该产品的对话
您可以在这里分享您对 Led LenserM8闪光灯 的看法。 如果您有疑问,请先仔细阅读手册。 可以使用我们的联系表索取手册。