说明书 MeFOTORoadTrip Travel三脚
需要您的 MeFOTORoadTrip Travel三脚 手册吗? 您可以在下面免费查看和下载中文版 PDF 手册。 该产品目前有 0 个常见问题,0 条评论,有 1 票,平均产品评分为 100/100。 如果这不是您想要的手册,请联系我们。
您的产品是否出现故障而说明书没能提供解决方案?请前往 Repair Café 以获得免费维修服务。
说明书
Loading…

www.mefoto.com4 5
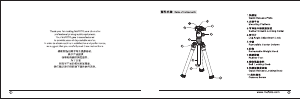
TRIPOD OPERATION
Before using your Tripod, adjust each Leg Section to the desired height and Leg Angle Setting. Make sure
that the Tripod is firmly resting on a level surface and mount your came rasecurely on the Tripod Head.
Always sengage any safety locks on the Tripod Head to prevent any accidental dismounting.
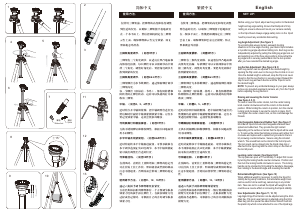
Leg Angle Adjustment (FIGURE 1)
To accommodate uneven terrain, awkward shooting situations or for low angle shooting, your MeFoto Tripod
includes a 2-position Leg Angle Adjustment Sliding Lock. Each Leg can be adjusted by pulling the Leg Angle
Lock out and selecting one of the two positions. Please make sure that the Leg Angle Lock is securely
pushed back into the lock position after you have selected the desired Leg Angle. After use, the Leg Angle
Adjustment Sliding Lock releases the unique Tripod Legs so they can be folded up 180°making it extremely
compact for easy carrying and packing.
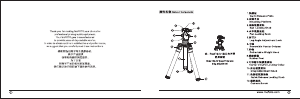
HEAD OPERATION
NOTE: Take special care when raising or lowering the Center Column, if a camera or equipment is mounted
on the Tripod. Never loosen the Center Column Locking Knob without holding the Center Column. Failure
to follow these instructions could result in damaged equipment.
Raising and Lowering the Center Column- (FIGURE 4)Series 1 & 2
To raise or lower the Center Column, turn the Center Column Locking Collar counter-clockwise and set the
Column to the desired position. While holding the Column in position, turn the Center Column Locking
Knob clockwise to secure the Column in place. Don't over-tighten the Center Column Lock, as this could
damage the threads.
Raising and Lowering the Telescoping Center Column – Series 0 (FIGURE 3)
To raise or lower the Telescoping Center Column, turn the Center Column Locking Knob counter-clockwise
and set the Column to the desired position. While holding the Column in position, turn the Center Column
Locking Knob clockwise to secure the Column in place. Don't over-tighten the Center Column Lock, as this
could damage the threads.
The MeFoto Double-Action Ball heads feature three operating Knobs. Drag control is manually adjusted
and locked, along with independent Panning. Plus a Universal Quick Release Clamp with secondary Safety
Lock System is incorporated.
The Double-Action Ball heads feature a Universal Quick Release Plate system. It offers a quick method of
mounting or releasing a Camera or Equipment from the Head. It's important that the correct Quick Release
Plate be used along with the proper mounting screw (1/4–20 is included as the standard size but spare
1/4–20 and 3/8 plates of various lengths are available as accessories). Extra Plates are recommended as
you can screw one to each Camera or Lens for even greater convenience when rapidly mounting and
dismounting gear. And because of compatibility with the Universal system, most plates and special
brackets from other manufacturers can be used as well.
Universal Quick Release Plate System
Quick Release Lock (FIGURE 8)
When used properly, the Quick Release Lock offers two levels of security for your gear. To remove the
Quick Release Plate, turn the Quick Release Locking Knob counter-clockwise. A partial opening of the
clamping mechanism allows the Quick Release Plate to slide on the Mounting Platform for proper balance
and positioning. Two Stop Screws (removable) on the bottom of the Quick Release Plate provide this first
level of security. An additional counterclockwise turn of the Quick Release Locking Knob opens the clamp
fully so that the Quick Release Plate can be tilted out to be removed. Reverse the process and tighten the
Quick Release Locking Knob to secure the Quick Release Plate.
Transfunctional Feature – Converting to a Monopod – Series 1 & 2 (FIGURE 6)
To assemble as a monopod first unscrew the Retractable Weight Hook and pull the Center Column
(with Head) out. Unscrew the Single tripod leg (the one with the foam grip). Screw the entire Center Column
(with Head) onto the top of the Single Leg.
Ballhead Controls (FIGURE 9)
A large Head Locking Knob locks the Ballhead in place. Once the Knob is turned counter-clockwise and
loosened, the Ballhead can move freely allowing the Mounting Platform to be positioned anywhere within
a 0–90° vertical orientation. This movement is expanded by the use of the Pan Locking Knob which adds
a 360° Panning range. The Pan control is fully independent and positioning can be adjusted easily and
accurately by using the Graduated Panning Scale and Pointer on the Base of the Ballhead. When the Head
Locking Knob is released, it is possible to move the Ballhead with some resistance or Drag. To achieve the
proper degree of Drag, mount the intended camera or equipment onto the Ballhead. While holding the
camera/lens loosen the Head Locking Knob until it is released. Turn the Drag Control Knob clockwise to
increase Drag, and counter-clockwise to decrease it.
FOR OPTIMUM RESULTS: Adjust the Drag under the weight capacity, temperature and conditions under
which the Ballhead will be used.
NOTE: Do not over tighten any Locking Knobs as this could damage the Ball head locking mechanism.
Your Tripod has the ability to reverse the Center Column for close-up photography, copy work and for
difficult to reach objects. To reverse the Center Column, unscrew the Retractable Weight Hook located on
the bottom of the Center Column. Loosen the Center Column Locking Collar and pull the Center Column out.
Insert the Center Column through the bottom with the Mounting Plate upside-down and retighten the Center
Column Locking Collar securely.
Reversible Center Column (FIGURE 5)-Series 1 & 2
NOTE: Do not reverse the Center Column when a camera or equipment is mounted.
Leg Section Adjustment (FIGURE 2)
Each Leg section can be adjusted to the desired length by turning the Leg Lock grip 1/2 turn (180°)
clockwise until the Leg is free to slide in or out. Once the desired length is achieved, turn the Leg Lock
Grip counter-clockwise until the Leg Section is securely locked. Repeat this step for each Leg until the
Tripod is set to the desired height.
NOTE: To prevent any accidental damage to your gear, always remove any mounted equipment
(camera, etc.) from the Tripod before adjusting the Leg Sections.
Retractable Weight Hook (FIGURE 7)
To help stabilize the tripod during windy conditions, hang a camera bag, sandbag or other similar item from
the retractable weight hook.
NOTE: Take care not to overload the tripod with extra weight as this could have a reverse effect on
increasing the stability of the tripod.
FOR EXTRA STABILITY: Carefully hang your camera bag or other weight on the Retractable Spring-Loaded
Weight Hook at the bottom of the Center Column.
NOTE: Never carry your Tripod with camera gear attached.
FOR BEST RESULTS: Do not raise the Tripod higher than necessary and extend the largest diameter Leg
Sections first. Only extend the Center Column if required to reach maximum height or to fine-tune the
vertical position.

Loading…
常见问题
请给产品评分,告知您对MeFOTORoadTrip Travel三脚看法。您是否希望分享对该产品的体验或提出问题?请在页面底部留言。有关本说明书的更多信息
我们知道,为您的 MeFOTORoadTrip Travel三脚 提供纸质手册是件好事。 您随时可以从我们的网站下载该手册并自行打印。 如果您想要原始手册,我们建议您联系MeFOTO。 他们也许能够提供原始手册。 您是否正在寻找其他语言版本的 MeFOTORoadTrip Travel三脚 手册? 在我们的主页上选择您的首选语言并搜索型号以查看我们是否有可用。
规格
| 品牌 | MeFOTO |
| 模型 | RoadTrip Travel |
| 类别 | 三脚 |
| 文件类型 | |
| 文件大小 | 1.31 MB |


加入有关该产品的对话
您可以在这里分享您对 MeFOTORoadTrip Travel三脚 的看法。 如果您有疑问,请先仔细阅读手册。 可以使用我们的联系表索取手册。