说明书 Oregon BAA 292H 气象站
需要您的 Oregon BAA 292H 气象站 手册吗? 您可以在下面免费查看和下载中文版 PDF 手册。 该产品目前有 5 个常见问题,0 条评论,有 0 票。 如果这不是您想要的手册,请联系我们。
您的产品是否出现故障而说明书没能提供解决方案?请前往 Repair Café 以获得免费维修服务。
说明书
Loading…
EN
INTRODUCTION
Thank you for selecting the Oregon Scientic™ PRYSMAchrome
Weather Station. This device bundles precise time keeping, alarm, and
temperature monitoring features into a single tool you can use from the
convenience of your home. Keep this manual handy as you use your
new product. It contains practical step-by-step instructions, as well as
technical specications and warnings you should know.
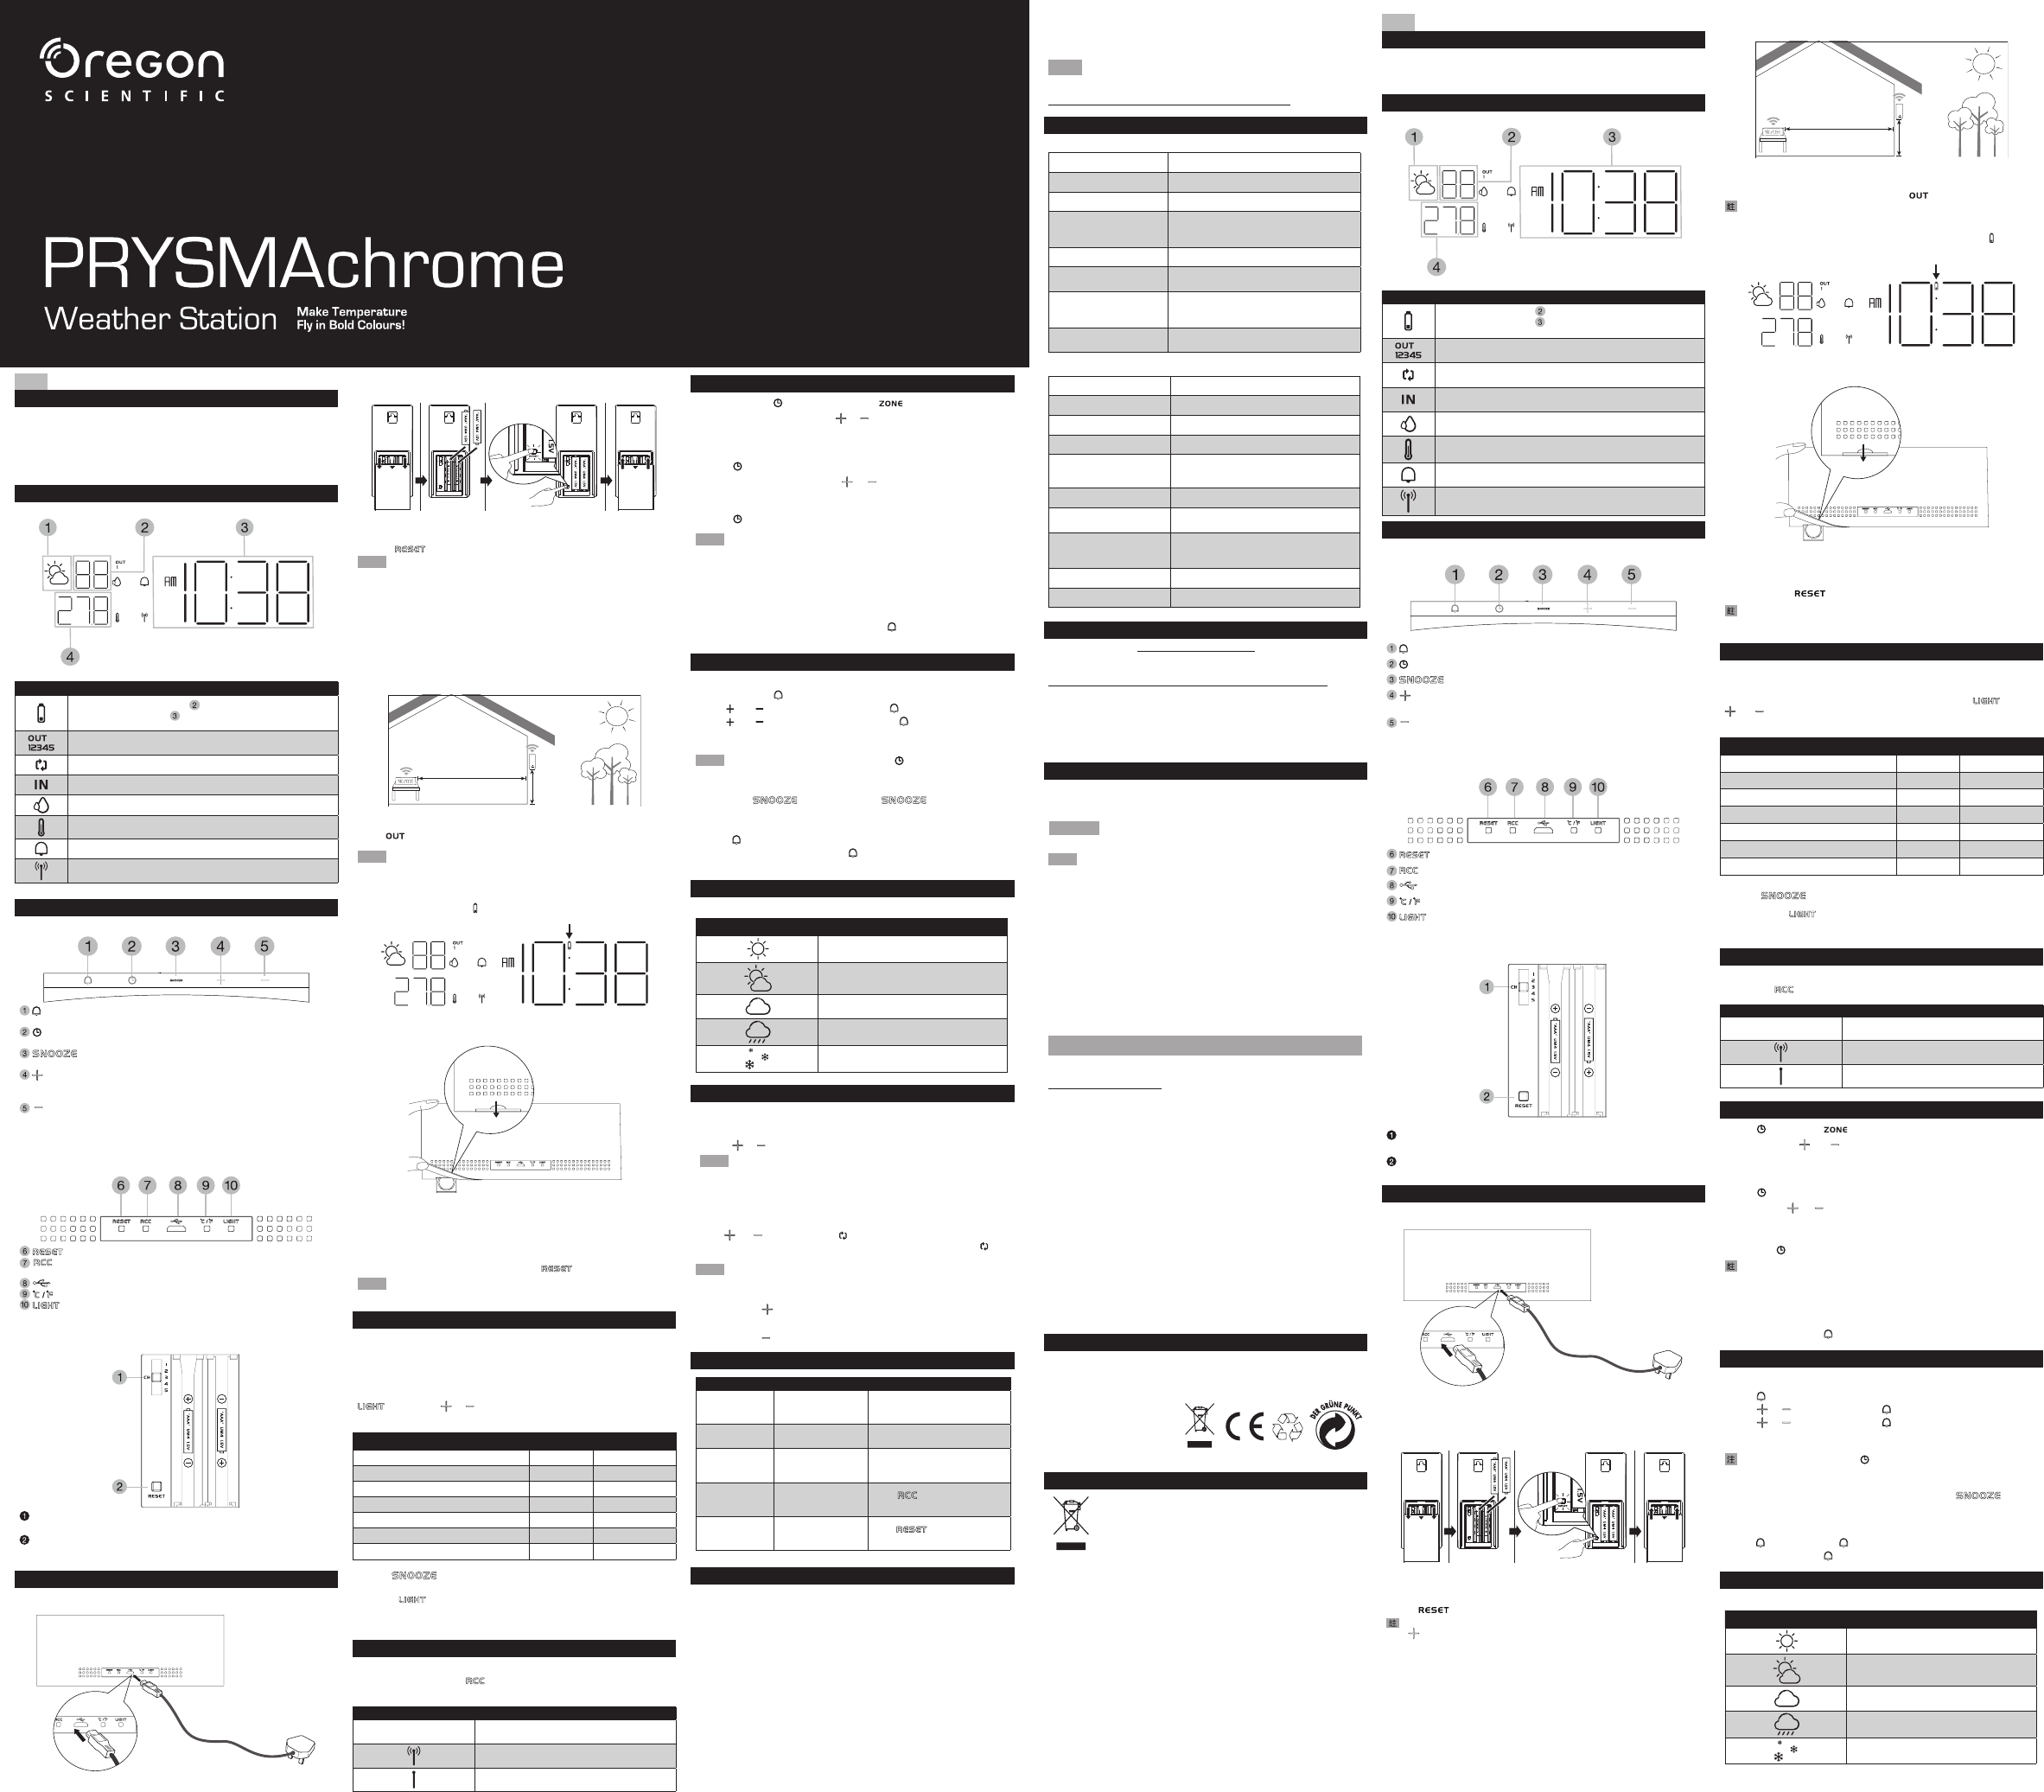
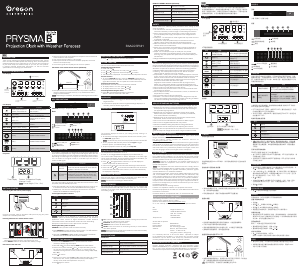
LCD DISPLAY
Time Display
Outdoor/Indoor
temperature display
Weather
forecast display
Outdoor/Indoor
humidity display
Icon Description
In humidity display area ( ): Low battery in remote sensor
In time display area (
): Low battery in main unit backup
battery (CR2032).
Remote sensor channel number
Temperature/humidity auto-loop indicator
Indoor temperature/humidity indicator
Humidity display indicator (%)
Temperature display indicator (°C/°F)
Alarm is on.
RCC signal reception indicator
OVERVIEW
TOP VIEW
- Press to toggle the alarm display and alarm on/off. Press and hold
to enter alarm setting.
- Press to toggle between time and date display. Press and hold to
enter the setting.
- Tap to snooze an alarm or activate the brightest backlight
for 5 seconds.
- Press to increase the value in setting, or press and hold to increase
a value rapidly in setting. Press to toggle the remote sensor channels
in ascending order, or press and hold to search for the remote sensor.
- Press to decrease the value in setting, or press and hold to
decrease a value rapidly in setting. Press to toggle the remote sensor
channels in descending order, or press and hold to remove selected
remote sensor.
REAR VIEW
- Press to reset the unit to default.
- Press to turn on the RCC signal reception. Press and hold to
turn off.
- Micro USB power jack
- Press to toggle the temperature unit.
- Press to toggle the backlight brightness level. Press and hold
to set the back light color.
Remote sensor
CH Channel 1-5. If more than one sensor is being used, make sure
each one has a different channel number.
RESET Press if the sensor is not working correctly, after battery
replacement or channel change.
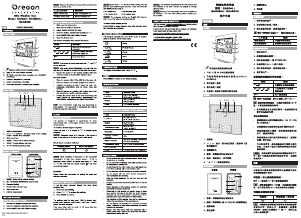
GETTING STARTED
Connecting the main unit to power supply
Connect the power cable to the Micro USB jack and plug the power
adaptor into a suitable power outlet.
Inserting batteries into remote thermo sensor
1. Slide down the battery compartment cover to open, then insert 2 “AAA”
batteries, matching the polarity as shown.
2. Press
. Slide to replace the battery compartment cover.
NOTE
The main unit can connect up to 5 sensor. Press and hold + on
the main unit to search for the remote sensor every time after adding a
new sensor.
Placement of the main unit
• Place the device as far as possible from computers and microwaves to
avoid any interference.
• Only use this device indoors in a dry location.
• Leave space around the device for ventilation purposes.
• To ensure for good sound quality, do not cover the speaker.
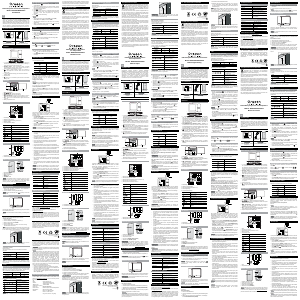
Placement of the remote thermo sensor
Min 5 ft (1.5 m)
Max 98 ft (30 m)
Place your sensor outside the home at a height of not more than 5 ft
(1.5 m), shielded from direct sunlight or wet conditions.
• The
icon on the main unit ashes while searching the signal from
the remote sensor.
NOTE
The radio signal reaches up to 98 ft (30 m) depending on
conditions of surrounding.
Replacing CR2032 backup battery
This unit is equipped with a CR2032 battery as a backup power source.
When the main unit shows
, replace the CR2032 backup battery.
To replace a CR2032 backup battery
1. Open up the bottom left corner of the rubber cover, then gently push
the arched part of the backup battery door downwards as shown
above.
2. Replace the CR2032 backup battery to the compartment, then push
the battery compartment back into the main unit. Connect the main
unit to the power supply and then press
.
NOTE
When replacing the backup battery, ip the bottom left corner
rubber cover only. Do not remove the entire rubber cover.
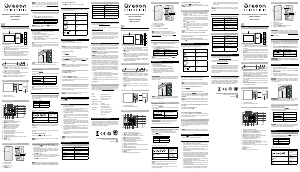
TEMPERATURE SENSITIVE LCD DISPLAY
The LCD display changes colors according to the temperature of the
rst sensor with the lowest channel number available (e.g channel 1). If
sensor channel 1 is not available, the LCD display will change its color
according to the temperature of the next sensor channel (e.g. channel 2)
available in ascending order.
You may also set the LCD display color manually by press and hold
, then press or to toggle between the desired color number,
or choose Auto to change colors according to the temperature.
Outdoor Temperature (Channel 1) Color Color number
≤ 5.9 °C Purple 1
6 °C - 10.9 °C Blue 2
11 °C - 15.9 °C Pale blue 3
16 °C - 20.9 °C Green 4
21 °C - 25.9 °C Yellow 5
26 °C - 30 °C Orange 6
≥30.1°C Red 7
• Tab
to activate the brightest backlight (LV. 3) display for
5 seconds.
• Press
repeatedly to toggle the desired backlight display
brightness level (LV. 1/LV. 2/LV. 3).
• The unit might take some time to change its LED display color.
RADIO RECEPTION
This feature is not available for BAA292H.
You may press and hold
to turn off the RCC signal icon on the LCD
display.
Symbol Description
RCC is off
RCC Time is received
No RCC signal received
SETTING TIME MANUALLY
1. Press and hold . The screen displays and the number ashes.
2. Press once or press and hold
or to adjust the setting. For EU/UK,
the time-zone offset sets the clock up to +/- 23 hours from the received
clock signal time. For US, the time-zone setting is Central (C); Eastern
(E); Atlantic (A); Newfoundland (N); Pacic (P); Mountain (M).
3. Press
to conrm.
4. Press once or press and hold
or to adjust the setting for 12/24
hour format, hour, minute, year, calendar format (month-day/day-
month), month, date and daylight saving time (DST) auto/off.
5. Press
again to conrm.
NOTE
• The daylight saving time (DST) setting is available for the United
States only.
• The RCC and daylight saving time (DST) are disabled when the
time/year, month or date is changed in the setting. The DST is also
disabled when the RCC is turned off. If you turn the RCC back on, the
DST resumes from the last setting.
• While in the setting mode, press and hold
to save the settings and
return to idle.
ALARM FUNCTION
Setting/adjusting alarm time
1. Press and hold .
2. Use
and to adjust the hour and press to conrm.
3. Use
and to adjust the minute and press to conrm.
4. The alarm icon displays in idle. When the alarm sounds, it lasts for
2minutes.
NOTE
While in the alarm setting mode, press to save the settings and
leave the alarm setting mode.
Snooze function
• To use the function, press the on top of the clock
when the alarm sounds. The alarm will stop and start again after 8 minutes.
Activating/deactivating the alarm
• Press to turn on the alarm, press twice to turn off the alarm.
• When the alarm sounds, press
to stop the alarm. The alarm will
reactivate on the next day.
WEATHER FORECAST
This product forecasts the next 12 hours of weather in nearby area.
Screen display Description
Sunny
Partly cloudy
Cloudy
Rainy
Snowy
TEMPERATURE AND HUMIDITY FUNCTION
The current outdoor/indoor temperature and humidity indicators locate at top
and bottom left of the screen. To receive outdoor temperature and humidity
information, you can connect up to 5 remote sensors to the main unit:
• Press
or to toggle sensor display.
NOTE
When the indoor temperature is lower than -5 °C (23.0 °F), the
screen displays LL.L. When it is higher than 50°C (122.0°F), the screen
displays HH.H.
When the indoor relative humidity is lower than 25%, the screen displays
LL. When it is higher than 95%, the screen displays HH.
To auto-loop between sensors:
Press or repeatedly until displays. The data on each sensor
displays for 3 seconds. Press +/-again turn off the auto-loop, the
icon
turns off.
NOTE
The sensor displays in ascending order. The main unit skips the
absent sensor and advances to the next present sensor.
To search for remote sensors:
Press and hold .
To remove selected sensor:
Press and hold .
TROUBLESHOOT
Problem Reason Solution
The main unit
does not display
at all.
The main unit is not
connected to the
power outlet.
Make sure the main unit is
connected with the power adapter.
The outdoor display
area is blank.
The outdoor sensor is
removed.
Reconnect the outdoor sensor.
The outdoor
display area
displays ---.
The main unit is unable
to receive data from
the remote sensor.
Check the connection between the
main unit and the sensor.
The main unit
does not receive
RCC signal.
BAA292H does not
support RCC signal
reception.
Press
to turn off the display
icon.
The main unit
does not display
properly.
The main unit is unable
to receive data from
the remote sensor.
Press
to reset the main
unit.
PRECAUTIONS
• Do not subject the unit to excessive force, shock, dust, temperature
or humidity.
• Do not immerse the unit in water. If you spill liquid over it, dry it
immediately with a soft, lint-free cloth.
• Do not clean the unit with abrasive or corrosive materials.
• Do not tamper with the unit’s internal components. This invalidates the
warranty.
• Only use fresh batteries. Do not mix new and old batteries.
• Images shown in this manual may differ from the actual display.
• When disposing this product, ensure it is collected separately for
special treatment.
• Placement of this product on certain types of wood may result in
damage to its nish for which Oregon Scientic will not be responsible.
Consult the furniture manufacturer’s care instructions for information.
• The contents of this manual may not be reproduced without the
permission of the manufacturer.
BAA292H
• Do not dispose old batteries as unsorted municipal waste. Collection of
such waste separately for special treatment is necessary.
• Please note that some units are equipped with a battery safety strip.
Remove the strip from the battery compartment before rst use.
NOTE
The technical specifications for this product and the contents
of the user manual are subject to change without notice. To download
an electronic copy of this user manual, please visit
http://global.oregonscientic.com/customerSupport.php.
SPECIFICATIONS
MAIN UNIT
L x W x H 22 x 200 x 80 mm
Weight 224 g without batteries
Temperature range -5.0 °C to +50.0 °C (23.0 °F to 122.0 °F)
Temperature accuracy
0°C to 40°C: ±1°C (± 2.0°F)
T<0°C : ±2°C (± 4.0°F)
T>40°C : ±2°C (± 4.0°F)
Temperature resolution 0.1°C (0.2°F)
Relative humidity
measurement
25% to 95% RH
Humidity accuracy
40% to 80% RH: ±5%
25% to 40% RH: ±7%
80% to 95% RH: ±7%
Power
5V adapter
CR2032 backup battery
REMOTE UNIT (THGN130H)
L x W x H 125 x 50 x 19.5 mm
Weight 59 g without batteries
Transmission range 30 m (98 ft) unobstructed
Temperature range -20 °C to 60 °C (-4 °F to 140 °F)
Temperature accuracy
0°C to 40°C: ±1°C (± 2.0°F)
T<0°C : ±2°C (± 4.0°F)
T>40°C : ±2°C (± 4.0°F)
Temperature resolution 0.1 °C (0.2 °F)
Relative humidity
measurement
25% to 95% RH
Humidity accuracy
40% to 80% RH: ±5%
25% to 40% RH: ±7%
80% to 95% RH: ±7%
Signal frequency 315 MHz
No. of channel selectable 5
ABOUT OREGON SCIENTIFIC
Visit our website www.oregonscientic.com to learn more about
Oregon Scientic products.
For any inquiry, please contact our Customer Services at
http://global.oregonscientific.com/customerSupport.php.
Oregon Scientic Global Distribution Limited reserves the right to
interpret and construe any contents, terms and provisions in this user
manual and to amend it, at its sole discretion, at any time without
prior notice. To the extent that there is any inconsistency between the
English version and any other language versions, the English version
shall prevail.
FCC STATEMENT
This device complies with Part 15 of the FCC Rules. Operation is subject
to the following two conditions: (1) This device may not cause harmful
interference, and (2) This device must accept any interference received,
including interference that may cause undesired operation.
WARNING
Changes or modications not expressly approved by the
party responsible for compliance could void the user’s authority to
operate the equipment.
NOTE
This equipment has been tested and found to comply with the
limits for a Class B digital device, pursuant to Part 15 of the FCC Rules.
These limits are designed to provide reasonable protection against
harmful interference in a residential installation.
This equipment generates, uses and can radiate radio frequency energy
and, if not installed and used in accordance with the instructions, may
cause harmful interference to radio communications. However, there is
no guarantee that interference will not occur in a particular installation.
If this equipment does cause harmful interference to radio or television
reception, which can be determined by turning the equipment off and on,
the user is encouraged to try to correct the nterference by one or more of
the following measures:
Reorient or relocate the receiving antenna.
Increase the separation between the equipment and receiver.
Connect the equipment into an outlet on a circuit different from that to which
the receiver is connected.
Consult the dealer or an experienced radio / TV technician for help.
DECLARATION OF CONFORMITY
The following information is not to be used as contact for support or
sales. Please call our customer service number (listed on our website at
www.oregonscientic.com), or on the warranty card for this product
for all inquiries instead.
We
Name: Oregon Scientic, Inc.
Address: 10778 SW Manhasset Dr.
UNIT B-2 Tualatin,
OR 97062 USA
Telephone No.: 1-800-853-8883
declare that the product
Product No.: BAA292H
Product Name: PRYSMAchrome
Manufacturer: IDT Technology Limited
Address: Block C, 9/F, Kaiser Estate,
Phase 1, 41 Man Yue St.,
Hung Hom, Kowloon, Hong Kong
is in conformity with Part 15 of the FCC Rules. Operation is subject
to the following two conditions: 1) This device may not cause harmful
interference. 2) This device must accept any interference received,
including interference that may cause undesired operation.
EU-DECLARATION OF CONFORMITY
Hereby, Oregon Scientic, declares that this PRYSMAchrome Weather
Station (Model: BAA292H) is in compliance with R&TTE directive 1999/5/
EC. A copy of the signed and dated Declaration of Conformity is available
on request via our Oregon Scientic Customer Service.
DISPOSAL INFORMATION FOR USERS
Pursuant to and in accordance with Article 14 of the Directive
2012/19/EU of the European Parliament on waste electrical and
electronic equipment (WEEE), and pursuant to and in accordance
with Article 20 of the Directive 2006/66/EC of the European
Parliament on batteries and accumulators and waste batteries.
The barred symbol of the rubbish bin shown on the equipment indicates
that, at the end of its useful life, the product must be collected separately
from other waste.
Please note that the batteries/rechargeable batteries must be removed
from the equipment before it is given as waste. To remove the batteries/
accumulators refer to the specifications in the user manual. Therefore,
any products that have reached the end of their useful life must be given
to waste disposal centers specializing in separate collection of waste
electrical and electronic equipment, or given back to the dealer when
purchasing a new WEEE, pursuant to and in accordance with Article 14 as
implemented in the country.
The adequate separate collection for the subsequent start-up of the
equipment sent to be recycled, treated and disposal of in an environmentally
compatible way contributes to preventing possible negative effects on
the environment and health and optimizes the recycling and reuse of
components making up the apparatus.
Abusive disposal of the product by the user involves application of the
administrative sanctions according to the laws in force.
TC
簡介
多謝閣下選購 Oregon Scientic™ PRYSMAchrome 天氣站。此設備將準
確時間計算、響鬧和溫度監察功能集於一身。請將此手冊放置於容易取得
的地方,以隨時查看您應該了解的逐步操作說明、技術規格和警告事項。
LCD 螢幕
쩪甬秄䗨
ᚊᆦ즃ᚊ
㓨᯳秄䗨
ᆿㄶ礤ွ
秄䗨
ᚊᆦ즃ᚊ㛗
᯳秄䗨
圖示 描述
出現於濕度顯示區域 ( ):遙控感應器的電量不足。
出現於時間顯示區域 (
):主裝置的後備電池電量不足
(CR2032)。
遙控感應器頻道號碼
溫度/濕度自動循環指示器
室內溫度/濕度指示器
濕度指示器 (%)
溫度指示器 (°C/°F)
已開啟響鬧
RCC 訊號接收指示器
概覽
俯視圖
- 按下以切換響鬧顯示和開啟/關閉響鬧。長按以進入響鬧設定。
- 按下以切換時間和日期。長按則可進入時間設定。
- 輕按以暫停響鬧或以最光亮程度開啟背光燈5秒。
- 按下以增加設定數值,或長按以快速增加設定數值。按下能以遞增
方式切換遙控感應器的頻道,或長按以搜尋遙控感應器。
- 按下以減低設定數值,或長按以快速減低設定數值。按下能以遞減
方式切換遙控感應器的頻道,或長按以移除已選取的遙控感應器。
後視圖
- 按下以重設裝置回預設置。
- 按下以開啟RCC 訊號接收功能,長按則可關閉。
- Micro 電源插孔。
- 按下以切換溫度單位。
- 按下以切換背光燈的光度。長按則可設定背光燈的顏色。
遙控感應器
CH 頻道 1-5。如果有多過一個感應器正在使用中,請確保每一個感應
器都有一個不同的頻道號碼。
如果感應器不能正常操作或剛更換了電池,請按下此按鈕。
開始使用
將主裝置連接至電源
將電源線路連接至Micro USB 插孔中,並將電源轉接器插入適當的電源插
座中。
將電池安裝至遙控熱能感應器中
1. 將電池槽蓋向下滑動以開啟槽蓋,並以符合電極的方式安裝 2 粒
「AAA」電池,如圖所示。
2. 按下
。將電池槽蓋向上滑動以裝回原位。
主裝置可配備最多5個感應器。每次加入新遙控感應器後,請於主裝置
長按
以搜尋。
放置主裝置
• 請將設備盡量放置在遠離電腦和微波爐的地方,以免出現任何干擾。
• 請只在乾爽的室內環境中使用此設備。
• 在設備周圍預留一些空間以作通風之用。
• 為確保聲音品質良好,請勿覆蓋揚聲器。
放置遙控熱能感應器
Min 5 ft (1.5 m)
Max 98 ft (30 m)
將感應器放置在家居的室外地方,其高度不應超過5呎 (1.5米), 並避免放
置於陽光直接照射或潮濕的環境中。
• 當從遙控感應器搜尋訊號時,主裝置上的
圖示便會閃動。
無線電訊號最多可傳達至98呎(30 米)的距離,視乎四周的環境而定。
更換CR2032 後備電池
此裝置配備了一粒 CR2032 電池以作後備電源。當主裝置顯示 時,請更
換 CR2032 後備電池。
如要更換 CR2032 後備電池
1. 打開橡膠蓋面的左下角,然後將後備電池槽蓋拱起的部份輕輕地向下
推,如上圖所示。
2. 更換電池插槽中的 CR2032 後備電池,然後將電池插槽推回主裝置中,
插上電源後按
。
當更換後備電池時,請只掀開橡膠蓋面的左下角。請勿將整塊橡膠蓋
面移除。
溫度感應 LCD 螢幕
LCD 螢幕的顏色,會根據最低頻道號碼且可使用的感應器溫度而轉變 (例
如頻道 1)。如果感應器頻道 1 為不能使用,LCD 螢幕的顏色則會根據下
一個感應器頻道 (以遞增方式尋找下一個可使用頻道) 的溫度而轉變 (例如
頻道 2)。您亦可以手動設定LCD 螢幕的顏色,只需長按
,然後按
或 來切換不同的顏色 (請參閱下表),或選擇Auto 以根據溫度來改
變顏色。
室外溫度 顏色 顏色號碼
≤ 5.9 ℃
紫色
1
6 ℃ - 10.9 ℃
藍色
2
11 ℃ - 15.9 ℃
淺藍色
3
16 ℃ - 20.9 ℃
綠色
4
21 ℃ - 25.9 ℃
黃色
5
26 ℃ - 30 ℃
橙色
6
≥30.1℃
紅色
7
• 輕按
來以最光亮程度 (LV.3)啟動背光燈5秒。
• 重覆地按下
以切換到喜歡的背光燈照明亮度 (LV.1/LV.2/LV.3)。
• 此裝置可能需要一段時間來改變LCD螢幕的顏色。
無線電接收
此功能不適用於BAA292H。
你可以長按
以關閉LCD螢幕上的顯示。
符號 描述
已關閉RCC
已接收RCC 時間
沒有接收到 RCC訊號
手動設定時鐘
1. 長按 . 畫面會顯示 以及數字閃動。
2. 按一次或長按
或 以調整設定數值。對於歐洲/英國,時區偏移
會從所接收到的時鐘訊號時間將時鐘最多設定為 +/- 23小時。而美國地
區,時區設定為中部 (C)、東岸 (E)、大西洋 (A)、紐芬蘭 (N)、太平洋
(P) 及山區 (M)。
3. 按下
以確定。
4. 按下或長按
或 來調教以下設定:12/24 小時格式、小時、分鐘、
年份、行事曆格式 (月份-日子/日子-月份)、月份、日期及日光節約時間
(DST) 為自動/關閉。
5. 再次按下
以確定。
• 日光節約時間 (DST) 設定只在美國提供。
• 當在設定中變更了時間/年份、月份或日期後,RCC 及日光節約時
間 (DST) 便會關閉。當 RCC 關閉時 DST 亦會關閉。如果再次開啟
RCC,DST則會重設回最後的設定數值。
• 在設定模式中,按下
來儲存設定及回到閒置狀態。
響鬧功能
設定/調教響鬧時間
1. 長按 。
2. 使用
或 來調教小時,並按下 來確定。
3. 使用
或 來調教分鐘,並按下 來確定和回到閒置狀態。
4. 閒置時會顯示響鬧圖示。當響鬧響起,聲音會持續2分鐘。
當在響鬧設定模式時,按下 便可儲存設定和回到閒置狀態。
小睡功能
• 如要使用小睡功能,當響鬧響起時請按下時鐘頂部的 ,響鬧便
會停止,並在8分鐘後再次響起。
啟動/關閉響鬧
• 按下 來開啟響鬧,按 兩次則可將響鬧關閉。
• 當響鬧響起時,按下
便可停止。響鬧將會在下一天再次啟動。
天氣預測
此產品能預測未來 12小時附近地區的天氣狀況。
顯示畫面 描述
晴天
間中有陽光
陰天
下雨
下雪

Loading…
常见问题
请给产品评分,告知您对Oregon BAA 292H 气象站看法。您是否希望分享对该产品的体验或提出问题?请在页面底部留言。有关本说明书的更多信息
我们知道,为您的 Oregon BAA 292H 气象站 提供纸质手册是件好事。 您随时可以从我们的网站下载该手册并自行打印。 如果您想要原始手册,我们建议您联系Oregon。 他们也许能够提供原始手册。 您是否正在寻找其他语言版本的 Oregon BAA 292H 气象站 手册? 在我们的主页上选择您的首选语言并搜索型号以查看我们是否有可用。
规格
| 品牌 | Oregon |
| 模型 | BAA 292H |
| 类别 | 气象站 |
| 文件类型 | |
| 文件大小 | 3.52 MB |
Oregon 气象站 的所有手册
气象站 的更多手册
关于 Oregon BAA 292H 气象站 的常见问题
我们的支持团队将搜索有用的产品信息并回答常见问题。如果您在常见问题中发现不准确的回答,请使用联系表格告知我们。
天气预报说会下雨,但并没有下。这是为什么呢? 验证
天气预报的信息是依据气压进行判断的。一般来说,低压意味着恶劣天气,高压意味着好天气。天气模式的发展可能会与气压预测的有所不同。
有帮助 (1403) 阅读更多气象站及其传感器的最佳位置是什么? 验证
气象站本身放置在内部,需要远离热源,例如厨房,窗户或电器。一个单独的外部温度传感器需要放置在阴影中,并且离地面至少1.25m。雨水传感器需要放置在可以随时收集雨水的开放区域中。风传感器也需要放置在开放区域中,任何障碍物都会影响风。
有帮助 (334) 阅读更多设备中的电池被氧化了,我仍可以安全使用吗? 验证
Ja,该设备仍然可以安全使用。首先,取出氧化电池。切勿徒手操作。然后用蘸有醋或柠檬汁的棉签清洁电池盒。晾干并插入新电池。
有帮助 (233) 阅读更多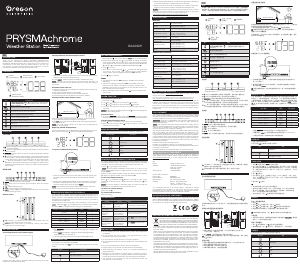
加入有关该产品的对话
您可以在这里分享您对 Oregon BAA 292H 气象站 的看法。 如果您有疑问,请先仔细阅读手册。 可以使用我们的联系表索取手册。