说明书 TimexTW5M23000GP手表
需要您的 TimexTW5M23000GP手表 手册吗? 您可以在下面免费查看和下载中文版 PDF 手册。 该产品目前有 6 个常见问题,0 条评论,有 0 票。 如果这不是您想要的手册,请联系我们。
您的产品是否出现故障而说明书没能提供解决方案?请前往 Repair Café 以获得免费维修服务。
说明书
Loading…

1
ENGLISH 02W-095000
EXTENDED WARRANTY
Available in U.S. only. Extend your warranty for an additional 4 years from
date of purchase for $5. You can pay with AMEX, Discover, Visa or MasterCard
by calling 1 800-448-4639 during normal business hours. Payment must be
made within 30 days of purchase. Name, address, telephone number, purchase
date, and 5-digit model number required. You can also mail a check for $5 to:
Timex Extended Warranty, P.O. Box 1676, Dept. EF, Little Rock, AR 72203.
Please read instructions carefully to understand how to operate your Timex
®
watch. Your model may not have all of the features described in this
booklet.
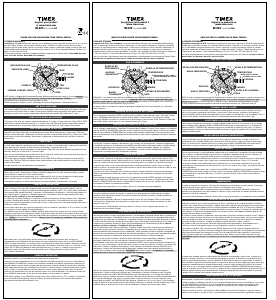
FEATURES AND BASIC OPERATION
1. Date with MM-DD format (month/day)
2. 24-Hour Stopwatch with Split time
3. 3 Alarms (Daily or Weekly) and Hourly Chime
4. 24-Hour Countdown Timer
5. Dual Time (Digital 2nd Time Zone)
6. INDIGLO
®
night-light
SET
(To save
changes and
exit setting)
MODE
(Proceed to
next step)
CROWN
ST/STP
(Increase value. Hold
to increase rapidly)
INDIGLO
®
Button
Button functions shown with setting functions in parentheses
TIME
To set time and date
1. To start your watch remove the plastic guard from under the crown, then
press the crown in against the case. The second hand will begin advancing
in one-second intervals.
2. Pull the crown out all the way and turn to the correct analog time. Push the
crown in to restart the analog watch.
3. From Time of Day mode in the digital watch, press and hold SET. The
Seconds can be seen ashing.
4. Press ST/STP to set Seconds to zero adding one minute if seconds are
“30” or greater.
5. Press MODE to set Hours, as indicated by its ashing. Press ST/STP to
advance the Hours setting. Press and hold to increment quickly.
6. Press MODE to set Minutes, as indicated by its ashing. Press ST/STP to
advance the Minutes setting. Press and hold to increment quickly.
7. Press MODE to set the Month number, as indicated by its ashing. Press
ST/STP to advance the Month setting. Press and hold to increment
quickly.
8. Press MODE to set the Date, as indicated by its ashing. Press ST/STP to
advance the Day setting. Press and hold to increment quickly.
9. Press MODE to set the Day, as indicated by the ashing segment. Press
ST/STP to advance the Day setting. Press and hold to increment quickly.
10. Press MODE to set the Time Format, as indicated by its ashing (12H or
24H). Press ST/STP to toggle the setting.
11. Press SET to exit Time Set.
Note: 12-Hour time has no indicator in the morning and a “PM” indicator after
Noon.
Note: To peek at the Month/Date setting from Time mode, press and hold
ST/STP.
STOPWATCH
Use this function for timing events.
1. Press MODE until “SP” appears.
2. Press ST/STP to start timing.
3. With the stopwatch running, press SET to record a Split time. The
stopwatch will continue timing in the background.
4. Press SET to release the display and show the current running
stopwatch time.
5. Press SET to record another Split time.
6. Press ST/STP to pause the timing.
7. Either press ST/STP to resume timing, or press SET to reset the Stopwatch
to zero.
Note: If the Stopwatch was paused when the display was showing a Split time,
the rst press of SET will show the nal recorded time, and the second press
will reset the Stopwatch to zero.
LAP 1 = 7.11 LAP 2 = 7.50
SPLIT 2 = 15.01
LAP 3 = 7.08
SPLIT 3 = 22.09
LAP 4 = 7.30
SPLIT 4 = 29.39
SPLIT 1 = 7.11
ALARM
To turn on/o or to set one of the 3 Daily alarms, or to turn on/o an hourly
chime.
1. Press MODE until “A1” (Alarm 1) appears.
2. Press SET to access “A2” (Alarm 2), “A3” (Alarm 3), “CH” (Hourly Chime),
or “BP” (Button Beep)
3. Press ST/STP to toggle the Selected Alarm (AL graphic) on/o, to toggle
the Hourly Chime (CH graphic in a dark box) on/o, or to toggle Button
Beep ON/OFF.
4. To Set an Alarm, press and hold SET. The Alarm eld ashes.
5. Press ST/STP to select one of the 3 alarms to set.
6. Press MODE to go the Hours setting as indicated by its ashing
7. Press ST/STP to advance the Hours setting. Press and hold to increment
quickly.
Note: The Hours will be presented in the same format (12- or 24-hour time) as
the time setting.
8. Press MODE to set the Minutes as indicated by its ashing. Press ST/STP
to advance the Minutes setting. Press and hold to increment quickly.
9. Press MODE to select the applicable Time Zone, as indicated by its
ashing (T1 or T2). Press ST/STP to toggle the setting.
10. Press MODE to select the alarm Frequency, as indicated by its ashing
“DA” (Daily) or “WE“ (Weekly). Press ST/STP to toggle the setting.
11. Press MODE to turn the alarm “ON” or “OFF”. Press ST/STP to toggle
the setting.
12. Press SET to exit the Alarm Set.
13. When the alarm sounds, press ANY button to silence the alert, or it will
stop automatically in about 20 seconds.
COUNTOWN TIMER
Use this function for timing events or tasks that have a dened end.
1. Press MODE until “TR” appears.
2. To Set the Timer, press and hold SET. The Hour digit ashes.
3. Press ST/STP to advance the Hours setting. Press and hold to increment
quickly.
4. Press MODE to set the Minutes as indicated by its ashing. Press ST/STP
to advance the Minutes setting. Press and hold to increment quickly.
5. Press MODE to set the Seconds as indicated by its ashing. Press
ST/STP to advance the Minutes setting. Press and hold to increment
quickly.

Loading…
常见问题
请给产品评分,告知您对TimexTW5M23000GP手表看法。您是否希望分享对该产品的体验或提出问题?请在页面底部留言。有关本说明书的更多信息
我们知道,为您的 TimexTW5M23000GP手表 提供纸质手册是件好事。 您随时可以从我们的网站下载该手册并自行打印。 如果您想要原始手册,我们建议您联系Timex。 他们也许能够提供原始手册。 您是否正在寻找其他语言版本的 TimexTW5M23000GP手表 手册? 在我们的主页上选择您的首选语言并搜索型号以查看我们是否有可用。
规格
| 品牌 | Timex |
| 模型 | TW5M23000GP |
| 类别 | 手表 |
| 文件类型 | |
| 文件大小 | 0.71 MB |
关于 TimexTW5M23000GP手表 的常见问题
我们的支持团队将搜索有用的产品信息并回答常见问题。如果您在常见问题中发现不准确的回答,请使用联系表格告知我们。
设备中的电池被氧化了,我仍可以安全使用吗? 验证
Ja,该设备仍然可以安全使用。首先,取出氧化电池。切勿徒手操作。然后用蘸有醋或柠檬汁的棉签清洁电池盒。晾干并插入新电池。
有帮助 (781) 阅读更多


加入有关该产品的对话
您可以在这里分享您对 TimexTW5M23000GP手表 的看法。 如果您有疑问,请先仔细阅读手册。 可以使用我们的联系表索取手册。