说明书 华硕 BX701 鼠标
需要您的 华硕 BX701 鼠标 手册吗? 您可以在下面免费查看和下载中文版 PDF 手册。 该产品目前有 4 个常见问题,0 条评论,有 0 票。 如果这不是您想要的手册,请联系我们。
您的产品是否出现故障而说明书没能提供解决方案?请前往 Repair Café 以获得免费维修服务。
说明书
Loading…

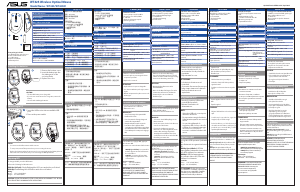
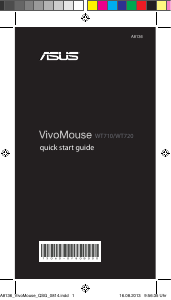
BX701 Bluetooth Laser Mouse
PORTUGUÊS
A embalagem inclui:
a. Rato a laser Bluetooth
b. 2x pilhas AAA
c. Guia de consulta rápida
Instalar a bateria
1. Remova a tampa.
2. Coloque as pilhas
no respectivo
compartimento
respeitando a
polaridade correcta.
3. Volte a colocar a tampa.
ATENÇÃO
:
• As pilhas fornecidas não
são recarregáveis.
• Se não pretender
utilizar o rato durante
um longo período
de tempo, remova as
pilhas.
• Utilize pilhas novas e do
mesmo tipo.
Ligação ao PC
1. Coloque o interruptor
na posição On (Ligado).
2. Pressione e liberte
o botão CONNECT
(LIGAR) na parte
inferior do rato. O LED
de alimentação cará
vermelho.
3. Emparelhe o rato com o
computador. Utilize um
adaptador Bluetooth se
o seu computador não
possuir conectividade
Bluetooth incorporada.
NOTAS:
• O adaptador Bluetooth
deverá ser adquirido
separadamente.
• Para obter mais
detalhes acerca do
emparelhamento do seu
computador com outros
dispositivos Bluetooth,
consulte a documentação
fornecida com o
computador ou com o
adaptador Bluetooth.
• Para poupar energia,
desligue o rato quando
não estiver a utilizá-lo.
• Quando o rato estiver
inactivo ou não for
utilizado durante
8 minutos, entrará
automaticamente em
modo de suspensão para
poupar energia. Desloque
o rato para o reactivar.
Características
1 Botão esquerdo: Clique
esquerdo
2 Botão direito: Clique direito
3 Roda: Deslocamento para
cima/baixo e clique com o
botão do meio
4 Botão lateral superior:
Avançar (Internet)
5 Botão lateral inferior
:
Voltar (Internet)
6 LED de Energia:
Indica o
nível da bateria.
ROMÂNĂ
Pachetul dvs include:
a. Mouse laser Bluetooth
b. 2 baterii AAA
c. Ghid de pornire rapidă
Instalarea bateriei
1. Scoateţi capacul.
2. Introduceţi bateriile
în compartiment,
respectând polaritate.
3. Repuneţi capacul.
ATENŢIE:
• Bateriile furnizate nu
sunt reîncărcabile.
• În cazul în care nu
veţi utiliza mouse-ul o
perioadă mai lungă de
timp, scoateţi bateriile.
• Utilizaţi baterii noi şi de
acelaşi tip.
Conectarea la PC
1. Apăsaţi pe butonul de
alimentare.
2. Apăsaţi şi eliberaţi
butonul CONNECT
(Conectare) din partea
inferioară a mouse-ului.
Ledul de alimentare se
va aprinde şi va roşu.
3. Împerecheaţi mouse-ul
cu computerul. Utilizaţi
un adaptor pentru
Bluetooth în cazul
în care computerul
nu dispune de o
capabilitate integrată
Bluetooth.
NOTE:
• Adaptorul Bluetooth se
achiziţionează separat.
• Pentru detalii referitoare
la împerecherea
computerului cu alte
dispozitive Bluetooth,
consultaţi documentaţia
livrată odată cu
computerul sau cu
adaptorul Bluetooth.
• Pentru a economisi
energie, opriţi alimentarea
atunci când nu utilizaţi
mouse-ul.
• Atunci când este inactive
sau nu a fost utilizat de
opt minute, mouse-ul
intră automat din modul
standby în modul repaus
pentru a economisi
energie. Mişcaţi mouse-ul
pentru a-l reactiva din
modul repaus.
Caracteristici
1 Buton stânga: Click stânga
2 Buton dreapta: Click dreapta
3 Rotiţă: Rulare în sus/jos şi
click mijloc
4 Buton stânga sus:
Înainte (Internet)
5 Buton stânga jos
:
Înapoi (Internet)
6 LED alimentare:
Indică
nivelul bateriei.
SLOVENSKY
Vaše balenie obsahuje:
a. Laserová myš s podporou
Bluetooth
b. 2x batérie typu AAA
c. Stručný návod na
používanie
Inštalácia batérie
1. Snímte kryt.
2. Do štrbiny vložte
batérie; dávajte pritom
pozor na polaritu.
3. Znovu nasaďte kryt.
UPOZORNENIE:
• Dodávané batérie nie sú
nabíjateľné.
• Pokiaľ nebudete myš
dlhodobo používať,
vyberte z nej batérie.
• Použite nové batérie
alebo batérie
podobného typu.
Pripojenie k PC
1. Zapnite hlavný vypínač.
2. Stlačte a uvoľnite
tlačidlo CONNECT
(PRIPOJIŤ) na spodku
myši. LED indikátor
napájania sa rozsvieti
na červeno.
3. Spárujte svoju myš
s počítačom. Ak váš
počítač neobsahuje
zabudovanú možnosť
pripojenia pomocou
technológie Bluetooth,
použite adaptér
Bluetooth.
POZNÁMKY:
• Adaptér Bluetooth sa
predáva samostatne.
• Informácie o párovaní
počítača s inými
zariadeniami s podporou
Bluetooth nájdete v
dokumentácii, ktorá sa
dodáva sa počítačom
alebo s adaptérom
Bluetooth.
• Kvôli úspore energie
vypnite napájanie
počas doby, kedy myš
nepoužívate.
• Pri nečinnosti alebo
nepoužívaní počas ôsmich
minút myš automaticky
prejde z pohotovostného
režimu do režimu úspory
energie. Myš zo spánku
zobudíte jej pohybom.
Funkcie
1 Ľavé tlačidlo: Kliknutie
ľavým tlačidlom
2 Pravé tlačidlo: Kliknutie
pravým tlačidlom
3 Koliesko: Rolovanie nahor/
nadol a kliknutie stredným
tlačidlom
4 Ľavé horné tlačidlo:
Dopredu (Internet)
5 Ľavé spodné tlačidlo
:
Naspäť (Internet)
6 Indikačná LED dióda
napájania: Indikuje stav
nabitia batérie.
SLOVENŠČINA
Vaš paket vsebuje:
a. Laserska Bluetooth miška
b. 2x bateriji AAA
c. Vodilč za hitri začetek
Namestitev baterije
1. Odstranite pokrov.
2. Vstavite bateriji v režo
in pazite na pravilno
polarnost.
3. Ponovno namestite
pokrov.
POZOR:
• Priložene baterije niso
polnilne.
• Če miške dalj časa
ne boste uporabljali,
odstranite baterije.
• Uporabite nove baterije
podobne vrste.
Povezovanje z računalnikom
1. Vključite napajalno
stikalo.
2. Pritisnite in spustite
gumb CONNECT
(Poveži) na dnu miške.
LED napajanja zasveti
rdeče.
3. Povežite miško
z računalnikom.
Uporabite vmesnik
Bluetooth, če vaš
računalnik nima
vgrajene funkcije
Bluetooth.
OPOMBE:
• Vmesnik Bluetooth lahko
kupite ločeno.
• Za podrobnosti o
povezovanju računalnika
z ostalimi napravami
Bluetooth glejte
dokumentacijo, ki
ste jo prejeli skupaj
z računalnikom ali
vmesnikom Bluetooth.
• Za varčevanje energije
vedno izključite miško,
kadar je ne uporabljate.
• Če miška miruje oz. ni v
uporabi dlje kot 8 minut,
samodejno preide v način
varčevanja z energijo.
Miško premaknite, če jo
želite zbuditi iz stanja
mirovanja.
Funkcije
1 Levi gumb: Levi klik
2 Desni gumb: Desni klik
3 Kolesce: Podrsajte gor/dol in
sredinski klik
4 Levi zgornji gumb:
Naprej (Internet)
5 Levi spodnji gumb
:
Nazaj (Internet)
6 LED napajanja:
prikazuje
stanje baterije.
ESPAÑOL
Su paquete incluye:
a. Ratón láser Bluetooth
b. 2x Pilas AAA
c. Guía de inicio rápido
Instalación de las baterías
1. Retire la tapa.
2. Inserte las pilas en la
ranura teniendo en
cuenta la polaridad
correcta.
3. Vuelva a colocar la tapa.
PRECAUCIÓN
:
• Las pilas incluidas no
son recargables.
• Si no va a utilizar el
ratón durante un
prolongado período de
tiempo, retire las pilas.
• Utilice pilas nuevas y de
tipo similar.
Conexión a un PC
1. Coloque el conmutador
de alimentación en la
posición de encendido
(ON).
2. Presione y suelte el
botón CONNECT
(CONECTAR) situado
en la parte de abajo
del ratón. El LED de
encendido se ilumina
en color rojo.
3. Asocie el ratón con
su PC. Utilice un
adaptador Bluetooth
si su PC no dispone
de la funcionalidad
Bluetooth.
NOTAS:
• El adaptador Bluetooth se
compra por separado.
• Para obtener detalles
sobre la asociación de su
PC con otros dispositivos
Bluetooth, consulte la
documentación que
se incluye con su PC o
adaptador Bluetooth.
• Para ahorrar energía,
desconecte la
alimentación cuando no
utilice el ratón.
• Si el dispositivo está
inactivo o no se
utiliza durante ocho
minutos, el ratón pasa
automáticamente del
modo de espera al modo
de suspensión para
ahorrar energía. Mueva
el ratón para reactivarlo
y sacarlo del modo de
suspensión.
Características
1 Botón izquierdo: Clic a la
izquierda
2 Botón derecho: Clic a la derecha
3 Rueda: Desplazamiento
hacia arriba/abajo y clic en
el centro
4 Botón superior lateral
izquierdo: Adelante
(Internet)
5 Botón inferior lateral
izquierdo: Atrás (Internet)
6 LED de alimentación:
indica el nivel de carga de
la batería.
TÜRKÇE
Ambalaj aăaăıdakileri içerir:
a. Bluetooth Lazer Fare
b. 2x AAA pil
c. Hızlı Başlangıç Kılavuzu
Pili takma
1. Kapağı çıkarın.
2. Kutuplarına dikkat
ederek pilleri yuvaya
yerleştirin.
3. Kapağı yerleştirin.
DİKKAT
:
• Verilen piller yeniden
şarj edilemez.
• Eğer fareyi uzun süre
kullanmayacaksanız,
pilleri çıkarın.
• Yeni olan ve aynı tipteki
pilleri kullanın.
PC’ye Bağlama
1. Güç anahtarını açın.
2. Farenin alt kısmındaki
CONNECT (BAĞLAN)
düğmesine basın ve
çekin. Güç LED’i kırmızı
yanar.
3. Farenizi bilgisayarınız
ile eşleştirin. Eğer
bilgisayarınızda dahili
Bluetooth özelliği yoksa
bir Bluetooth adaptörü
kullanın.
NOTLAR:
• Bluetooth adaptörü ayrıca
satın alınır.
• Bilgisayarınızı diğer
Bluetooth aygıtları ile
eşleştirmenin ayrıntıları
için bilgisayarınız veya
Bluetooth adaptörünüz
ile birlikte gelen belgelere
bakınız.
• Güçten tasarruf
etmek için, fareyi
kullanmadığınızda gücü
kapatın.
• Boşta iken ya da sekiz
dakika kullanılmadığında,
fare otomatik olarak
bekleme modundan
uyku moduna geçerek
güçten tasarruf eder. Uyku
modundan kaldırmak için
fareyi hareket ettirin.
Özellikler
1 Sol düğme: Sol tık
2 Sağ düğme: Sağ tık
3 Tekerlek: Yukarı/Aşağı
kaydırma ve orta tık
4 Sol taraf yukarı
düğmesi: İleri (İnternet)
5 Sol taraf aşağı düğmesi
:
Geri (İnternet)
6 Güç LED’i:
Pilin güç
seviyesini gösterir.
Українська
До комплекту входять:
a. Лазерна миша з Bluetooth
b. 2 x батареї AAA
c. Керівництво для
швидкого початку
експлуатації
Встановлення акумулятора
1. Зніміть кришку.
2. Вставте батареї до
отвору дотримуючись
полярності.
3. Поверніть кришку на
місце.
ОБЕрЕЖнО
:
• Батареї з комплекту
не підлягають
зарядженню.
• Якщо Ви протягом
тривалого часу не
користуєтеся мишею,
вийміть батареї.
• Використовуйте нові
батареї цього ж типу.
Підключення до ПК
1. Увімкніть перемикач
живлення.
2. Натисніть і відпустіть
кнопку CONNECT
(Підключення) внизу
на миші. Світлодіод
живлення стає
червоним.
3. Поєднайте мишу в
пару із комп’ютером.
Користуйтеся
адаптером Bluetooth,
якщо комп’ютер не має
вбудованого пристрою
Bluetooth.
ПРИМІТКИ:
• Адаптер Bluetooth слід
купувати окремо.
• Детальніше про
поєднання комп’ютера
в пару з іншими
пристроями Bluetooth
див. у документації до
комп’ютера або адаптера
Bluetooth.
• Щоб заощаджувати
енергію, вимикайте
живлення, коли Ви не
користуєтеся мишею.
• Бездіяльна протягом
восьми хвилин миша
автоматично переходить
з режиму очікування
в режим паузи, щоб
заощадити енергію.
Порухайте мишею, щоб
вивести її з режиму
очікування.
Особливі характеристики
1 Ліва кнопка: типові
функції лівої кнопки миші
2 Права кнопка: типові
функції правої кнопки миші
3 Коліщатко: Вертикальне
прокручення і функція
середньої кнопки
4 Верхня кнопка з лівого
боку: Вперед (Internet)
5 Нижня кнопка з лівого
боку: Назад (Internet)
6 Світлодіод живлення:
Позначає рівень заряду
батареї.
POLSKI
Opakowanie zawiera:
a. Laserowa mysz Bluetooth
b. baterie AAA
c. Instrukcja szybkiego
uruchomienia
Montaż/wymiana baterii
1. Zdejmij pokrywę.
2. Włóż do gniazda
baterie, sprawdzając
prawidłowy kierunek
biegunów.
3. Załóż z powrotem
pokrywę.
PRZESTROGA
:
• Dostarczonych baterii
nie można ładować.
• Jeśli mysz nie będzie
długo używana należy
wyjąć baterie.
• Należy użyć baterie
nowe i podobnego
typu.
Podłączanie do komputera
1. Włącz przełącznik
zasilania.
2. Naciśnij i zwolnij
przycisk CONNECT
(POŁĄCZ) na spodzie
myszy. Za świeci się
czerwone światło LED
zasilania.
3. Wykonaj parowanie
myszy i komputera. Użyj
adaptera Bluetooth, jeśli
komputer nie posiada
wbudowanej obsługi
Bluetooth.
UWAGI:
• Adapter Bluetooth należy
zakupić oddzielnie.
• Szczegółowe informacje
dotyczące parowania
komputera z innymi
urządzeniami Bluetooth,
sprawdź w dokumentacji
dostarczonej z
komputerem lub z
adapterem Bluetooth.
• W celu oszczędzania
energii należy wyłączyć
zasilanie jeśli mysz nie
będzie używana.
• W stanie bezczynności
lub po ośmiu minutach
nie używania, mysz
automatycznie przechodzi
z trybu oczekiwania do
trybu uśpienia w celu
oszczędzania energii.
Aby wybudzić mysz z
trybu uśpienia należy ją
przesunąć.
Funkcje
1 Lewy przycisk: Kliknięcie
lewym przyciskiem
2 Prawy przycisk: Kliknięcie
prawym przyciskiem
3 Kółko: Przewijanie do
góry/do dołu i kliknięcie
środkowym przyciskiem
4 Lewy, górny przycisk:
Dalej (Internet)
5 Lewy, dolny przycisk
:
Wstecz (Internet)
6 Wskačnik LED zasilania:
Wskazuje poziom
naładowania baterii.
MAGYAR
A csomagja a következăket
tartalmazza:
a. Bluetooth lézeres egér
b. 2x AAA elem
c. Gyors üzembe helyezési
útmutató
Az elem beszerelése
1. Távolítsa el a burkolatot.
2. A megfelelő polaritás-
jelzés szerint helyezze
be az elemet a rekeszbe.
3. Helyezze vissza fedelet.
VIGYÁZAT
:
• A mellékelt elemek nem
újratölthetőek.
• Ha hosszabb ideig nem
használja az egeret,
távolítsa el az elemeket.
• Új, vagy hasonló típusú
elemeket használjon.
Podłączanie do komputera
1. Kapcsolja be a
főkapcsolót.
2. Ezután nyomja meg
és engedje del az egér
alján lévő CONNECT
(Csatlakoztatás)
gombot. A
működésjelző LED színe
vörösre változik.
3. Párosítás az egeret
a számítógéppel.
Használjon Bluetooth
adaptert, ha
számítógépe nem
rendelkezik beépített
Bluetooth-funkcióval.
MEGJEGYZÉSEK:
• A Bluetooth adapter külön
kapható.
• A számítógép és
egyéb Bluetooth-
eszközök párosításával
kapcsolatos részleteket
illetően tekintse meg
a számítógéphez vagy
Bluetooth-adapterhez
mellékelt dokumentációt.
• Az energiatakarékosság
érdekében kapcsolja ki a
tápellátást, amikor nem
használja az egeret.
• Ha üresjáratban van,
vagy nyolc percig nem
használják, az egér
energiatakarékosság
érdekében automatikusan
készenléti módról alvó
módra vált. Mozgassa az
egeret, hogy feléledjen az
alvó üzemmódból.
Jellemzők
1 Bal gomb: Bal kattintás
2 Jobb gomb: Jobb kattintás
3 Kerék: Görgetés fel/le és
középső kattintás
4 Bal oldali felső gomb:
Előre (Internet)
5 Bal oldali alsó gomb
:
Vissza (Internet)
6 Hálózati LED:
Az
akkumulátor töltöttségi
szintjét jelzi.
1 ปุ่มซ้าย: คลิกซ้าย
2 ปุ่มขวา: คลิกขวา
3 ล้อ: เลื่อนขึ้น/ลง
และคลิกกลาง
6 LED เพาเวอร์: ระบุระดั
บพลังงานแบตเตอรี่
ไทย
แพคเกจของคุณประกอบด้วย:
การติดตั้งแบตเตอรี่
ข้อควรระวัง:
เชื่อมต่อกับคอมพิวเตอร์
Federal Communications
Commission Interference
Statement
This equipment has been tested and
found to comply with the limits for a Class
B digital device, pursuant to Part 15 of
the FCC Rules.
These limits are designed to provide
reasonable protection against harmful
interference in a residential installation.
This equipment generates, uses and can
radiate radio frequency energy and, if
not installed and used in accordance
with the instructions, may cause harmful
interference to radio communications.
However, there is no guarantee that
interference will not occur in a particular
installation.
If this equipment does cause harmful
interference to radio or television
reception, which can be determined
by turning the equipment off and on,
the user is encouraged to try to correct
the interference by one or more of the
following measures:
--Reorient or relocate the receiving
antenna.
--Increase the separation between the
equipment and receiver.
--Connect the equipment into an outlet
on a circuit different from that to which
the receiver is connected.
--Consult the dealer or an experienced
radio/TV technician for help.
This device complies with part 15 of the
FCC Rules.
Operation is subject to the following two
conditions:
(1) This device may not cause harmful
interference, and
(2) this device must accept any
interference received, including
interference that may cause undesired
operation.
CAUTION: Any changes or modifications
not expressly approved by the grantee of
this device could void the user’s authority
to operate the equipment.
FCC Radiation Exposure
Statement
This equipment complies with FCC
radiation exposure limits set forth for
an uncontrolled environment. End
users must follow the specific operating
instructions for satisfying RF exposure
compliance.
This transmitter must not be co-located
or operating in conjunction with any
other antenna or transmitter.
CE Mark Warning
This is a Class B product, in a domestic
environment, this product may cause
radio interference, in which case the
user may be required to take adequate
measures.
Declaration of Conformity (RT&TTE
directive 1999/5/CE)
The following items were completed and
are considered relevant and sufficient:
• Essential requirements as in [Article 3]
• Protection requirements for health and
safety as in [Article 3.1a]
• Testing for electric safety according to
[EN60950]
• Protection requirements for
electromagnetic compatibility in [Article
3.1b]
• Testing for electromagnetic
compatibility according to [Article 3.1b]
• Effective use of the radio spectrum as
in [Article 3.2].
• Radio test suites according to
[EN300440]
CAUTION! DO NOT throw the product in
municipal waste. This product has been
designed to enable proper reuse of parts
and recycling. This symbol of the crossed
out wheeled bin indicates that
the product (electrical and
electronic equipment) should
not be placed in municipal
waste. Check local regulations for
disposal of electronic products.
Manufacturer
ASUSTeK Computer Inc.
Tel: +886-2-2894-3447
Address: No. 150, LI-TE RD., PEITOU,
TAIPEI 112, TAIWAN
Authorised representative in
Europe
ASUS Computer GmbH
Address: HARKORT STR. 21-23,
D-40880 RATINGEN,
DEUTSCHLAND
Authorised distributor in Turkey
PENTA TEKNOLOJI URUNLERI
DAGITIM TICARET A.S.
Address: DUDULLU ORGANIZE
SANAYI BOLGESI NATO
YOLU 4.CAD.NO:1
DUDULLU UMRANIYE
34775 ISTANBUL, TURKEY
Tel: 0216 645 8200
EEE Yönetmeliğine Uygundur.
Q8219 / First Edition / March 2013

Loading…
常见问题
请给产品评分,告知您对华硕 BX701 鼠标看法。您是否希望分享对该产品的体验或提出问题?请在页面底部留言。有关本说明书的更多信息
我们知道,为您的 华硕 BX701 鼠标 提供纸质手册是件好事。 您随时可以从我们的网站下载该手册并自行打印。 如果您想要原始手册,我们建议您联系Asus。 他们也许能够提供原始手册。 您是否正在寻找其他语言版本的 华硕 BX701 鼠标 手册? 在我们的主页上选择您的首选语言并搜索型号以查看我们是否有可用。
规格
| 品牌 | Asus |
| 模型 | BX701 |
| 类别 | 鼠标 |
| 文件类型 | |
| 文件大小 | 1.22 MB |
关于 华硕 BX701 鼠标 的常见问题
我们的支持团队将搜索有用的产品信息并回答常见问题。如果您在常见问题中发现不准确的回答,请使用联系表格告知我们。
鼠标的最适用表面是什么? 验证
一个传统的轨迹球鼠标最好是与一块填充垫的表面一起使用,比如鼠标垫。 光学鼠标几乎可以在任何平面上工作,除了透明或者反射的表面。表面有重复印刷的表面有可能干扰鼠标的功能。
有帮助 (113) 阅读更多普通鼠标和游戏鼠标有什么区别? 验证
每个游戏鼠标都可以用作普通鼠标。但是,游戏鼠标通常在特定位置具有其他按钮,以使游戏更容易。甚至有些游戏鼠标带有可以更好地玩特定游戏的按钮。
有帮助 (45) 阅读更多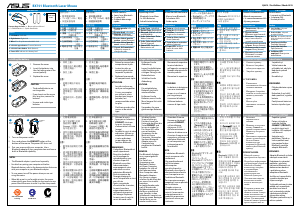

加入有关该产品的对话
您可以在这里分享您对 华硕 BX701 鼠标 的看法。 如果您有疑问,请先仔细阅读手册。 可以使用我们的联系表索取手册。